
nserting Form Data into MySQL Database Using HTML and PHP: A Step-by-Step Guide

Learn how to seamlessly insert form data into a MySQL database using HTML and PHP. This comprehensive guide covers creating an HTML form, connecting to a MySQL database, and processing form submissions securely and efficiently.
Collecting customer form data is a common task in web development. Contact forms make your site more professional and send a clear signal that you're interested in doing business with your potential clients. The lack of one could make your business seem outdated or unprofessional. People are more likely to patronize your products if you're highly accessible. This is a great way to increase your business's visibility.
Other reasons to implement a contact form:
- It makes your site more professional
- Security
- Makes yourself more reachable
- Automate email responses
Today, we will be learning how to insert customer form data into a MySQL database using HTML and PHP. We will be creating an HTML form and a PHP script to insert the data into the database usingphpMyAdmin.
Prerequisites:
Instructions:
As an example, the first thing we will need to do is create ourHTMLform. An HTML Form is a document that stores information about the user's interaction with a website. The form is a way for the user to send information to the database.
Form Elements...
The action attribute tells the form where to send the data. Themethodattribute tells the form how to send the data.
Connecting to the Database
A database is a collection of data. It is a way to store and retrieve data from a computer or server.
Xampp stands for "Extended Apache MySQL Platform". It is a free and open-source software that allows you to run a database server on your computer. It utilizes MySQL, Apache, PHP and Perl as its database engine, and it is free to use.
Example PHP Code:
connect_error) {
 die("Connection failed: "
 . $conn->connect_error);
}
// Insert into appropriate table
$sqlquery = "INSERT INTO table VALUES
 ('John', 'Doe', 'john@example.com')"

// If the connection is successful, run the query
if ($conn->query($sql) === TRUE) {
 echo "record inserted successfully";

// If the query is not successful, display the error message
} else {
 echo "Error: " . $sql . "
" . $conn->error;
}
?>
Processing form data:
We can collect the form data submitted through our HTML form that we're going to create. We can use the $_REQUEST variable to collect the data.
close();Setting up your Xampp Server
In order to successfully connect to the database and send over our form data, we need to set up our Xampp server to accept the incoming data:
- First we need to start our Xampp server.
- Navigate to
localhost/phpmyadmin. - Create a database name of
SampleDBand a table name ofSampleTable. - Create our HTML and PHP files in our Code Editor. I am using Visual Studio Code .
- Submit our data through the form we created.
- Check the results and verify that all data was successfully inserted.
Process:
First, you'll want to make sure that you already have XAMPP Server installed on your local machine. Once it's installed, let's begin by first opening up our Xampp application. In my case, I am using a Macbook Pro so things may look a little different if you're using Windows or another operating system. You'll want to make sure you have the following services running when you open up your Xampp application:
- MySQL Database
- Apache Web Server
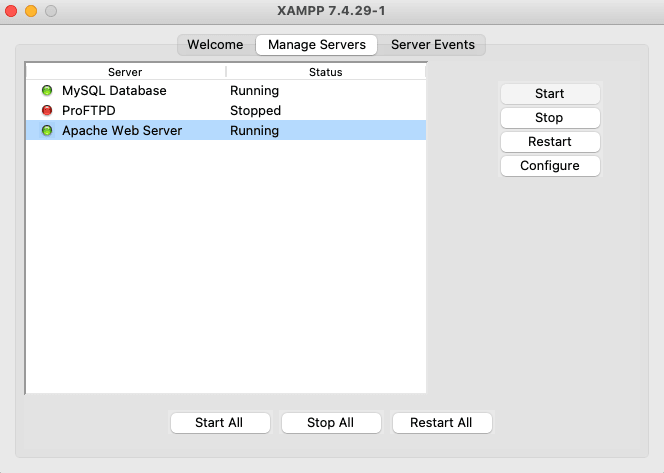
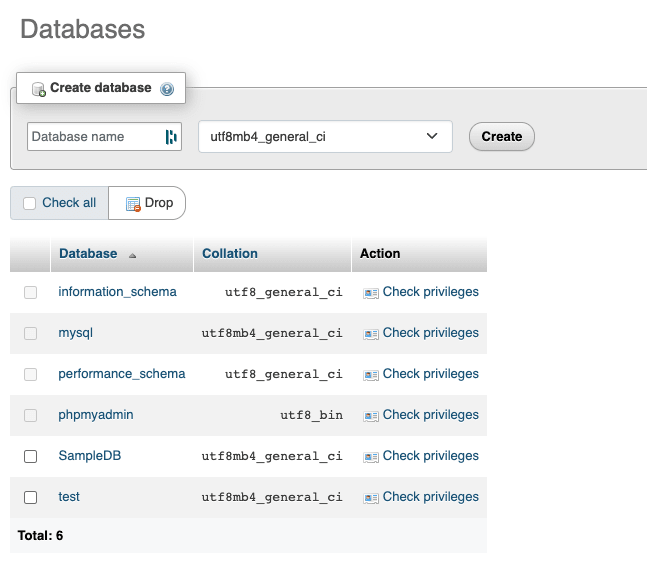
Now we can navigate over tolocalhost/phpmyadminand create a database and table.
- Click on
Newand then type in the name of your Database. We are going to name our databaseSampleDB. Once complete, go ahead and click theCreatebutton.
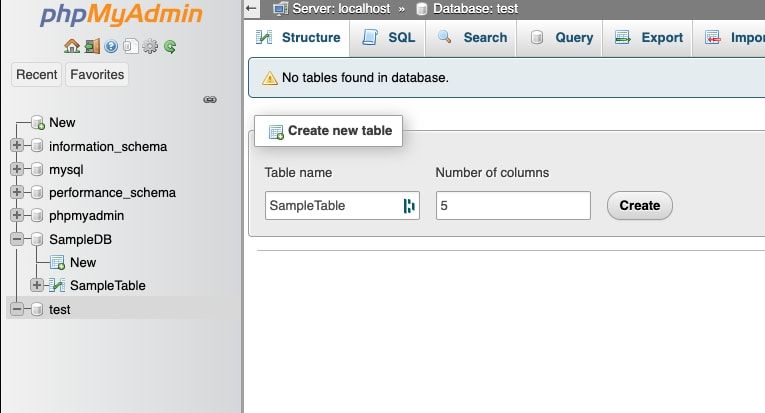
Next we can create the table we want to use namedSampleTable. Make sure to set the number of columns to 5. Once complete, click theCreatebutton.
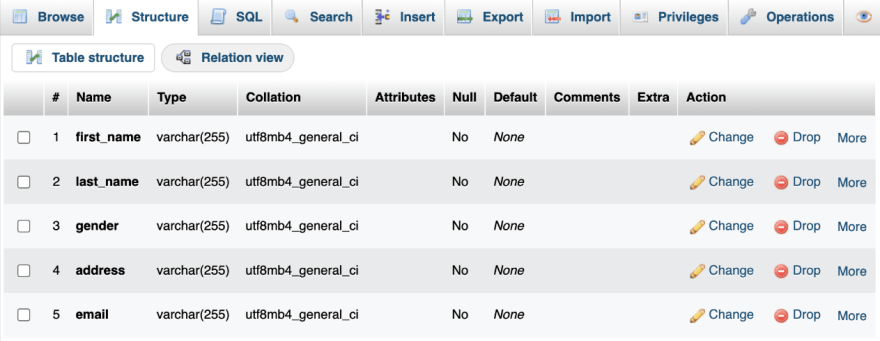
Now that our Database and Sample table is created, we can enter our columns and click on save.
Make sure you enter the correct data type for each column.
first_namelast_namegenderaddressemail
Also, make sure to add the appropriate type ofVARCHARto each item as well.
Create the html form
Now it's time to create our HTML form. We will be using this form to send the data to our database.
Filename:index.php
 Sample Form
<center>
    <h1>Storing Form data in Database</h1>
    <form action="insert.php" method="post">
        <p><label for="firstName">First Name:</label> <input type="text" name="first_name" id="firstName" /></p>
        <p><label for="lastName">Last Name:</label> <input type="text" name="last_name" id="lastName" /></p>
        <p><label for="Gender">Gender:</label> <input type="text" name="gender" id="Gender" /></p>
        <p><label for="Address">Address:</label> <input type="text" name="address" id="Address" /></p>
        <p><label for="emailAddress">Email Address:</label> <input type="text" name="email" id="emailAddress" /></p>
        <input type="submit" value="Submit" />
</form>
</center>
Create the php script
Now we need to create our PHP script. This is the script that will process our form data and insert it into our database.
Filename:insert.php
 Insert Page page

    <!--?php

    // servername = localhost
    // username => root
    // password => empty
    // database name => staff
    $conn = mysqli_connect("localhost", "root", "", "sampleDB");
    // Check connection if($conn === false){ die("ERROR: Could not connect. " . mysqli_connect_error()); }
    // Taking all 5 values from the form data(input)
    $first_name = $_REQUEST['first_name'];
    $last_name = $_REQUEST['last_name'];
    $gender = $_REQUEST['gender'];
    $address = $_REQUEST['address'];
    $email = $_REQUEST['email'];
    // We are going to insert the data into our sampleDB table
    $sql = "INSERT INTO sampleDB VALUES ('$first_name', '$last_name','$gender','$address','$email')";
    // Check if the query is successful
    if(mysqli_query($conn, $sql)){
        echo "<h3>data stored in a database successfully." . " Please browse your localhost php my admin" . " to view the updated data</h3>";
        echo nl2br("\n$first_name\n $last_name\n " . "$gender\n $address\n $email");
    } else{
        echo "ERROR: Hush! Sorry $sql. " . mysqli_error($conn);
        }
    // Close connection mysqli_close($conn);
    ?>
Great! Now we can submit our form data to our database but first we need to save ourindex.phpandinsert.phpfiles inside of ourhtdocsfolder located inside our Xampp directory.
HTDOCS Folder
We can access this folder by opening up our Xampp application and then clicking onOpen Application Folder.
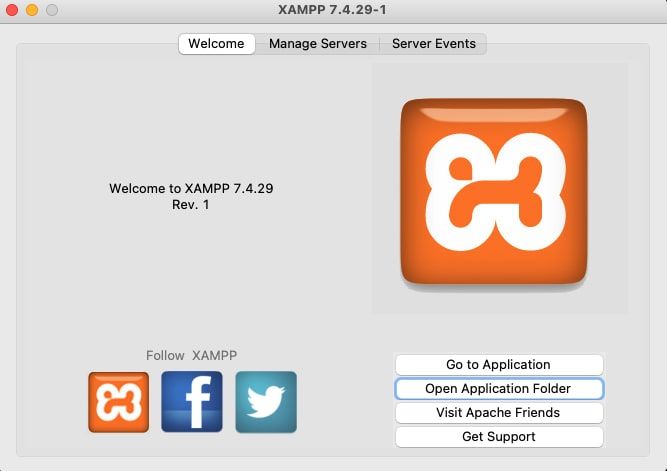
This will open up our Xampp files directory. Navigate to thehtdocsfolder and copy yourindex.phpandinsert.phpfiles directly into this directory. This will overwrite the existing file. Now we can head over tolocalhost/index.phpto fill out the form submit it to our database.
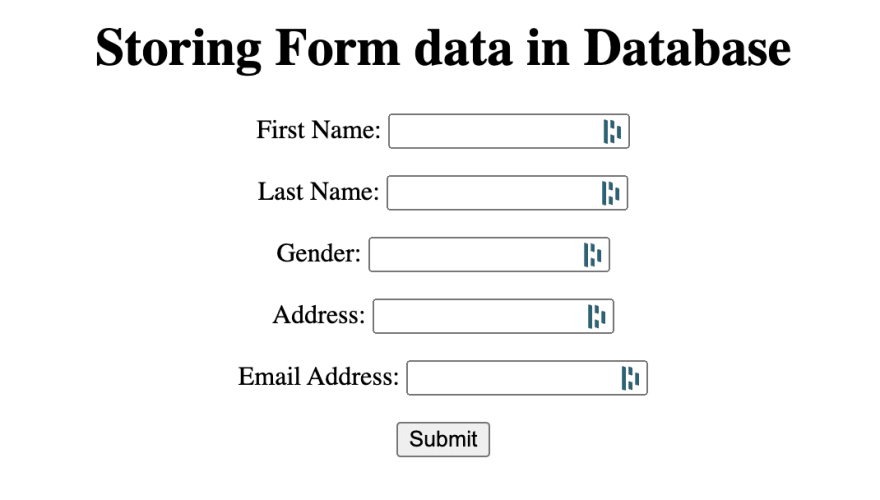
Fill out the form and then clicksubmit. Great! it looks like our data has been successfully stored in our DB.
localhost/phpmyadminand select your database to ensure that our data was successfully inserted.Conclusion
You have just completed the basic steps to store data in a database using HTML and PHP. You can now use this method to create any kind of form you like and attach it to a phpMyAdmin database.

