
How to Dockerize a React Application – A Step by Step Tutorial

Picture this: you have developed an application that is ready to be deployed. You have worked really hard on it, so you want to make sure it gets deployed seamlessly and the final product is both fast and reliable. Enter images and containers. Images and
Images and containers help you package your application and run it in a lightweight and isolated environment. Containers make it possible to make faster and scalable deployments. And it's not that hard to start using them. All you have to do is write some scripts and run a few commands to have a container up and running. How cool is that?
In this tutorial, I am going to take a React application and show you, step by step, how to build an image, push it to a remote registry, and use that image to run your application in a container.
To follow along with this tutorial, I am assuming you are already familiar with the basics of images and containers. I'll start by explaining what Docker is and then dive into the process.
What is Docker?
Docker is an open-source platform developer by Docker, Inc. It enables you to package your application and its dependencies and run it all in an isolated environment, called the container. With just a small set of instructions, you can easily build images and run them as containers.
Docker containers are extremely lightweight and efficient. Due to isolation, each container runs differently and the container processes do not interfere with each other. Docker also has its own version control system, Docker Hub, which we'll discuss later on in the tutorial.
Docker is widely used by enterprise technologies and cloud services that have chosen to adopt containerization for faster deployments. Lastly, Docker has a vast community and an ever-expanding ecosystem of tools and services. For more info, you can go through the docs .
Okay, enough about Docker (actually, not). You are here to get some hands-on practice and that's what we'll do here. Before we get started, you first need to install Docker on your system. Refer to this for a guide on installing Docker on different operating systems.
Run the commanddocker --versionto check if Docker is installed.
How to Create a Simple React Application
Use the following command to set up a simple React application.
create-react-app react-docker-exampleYou do not need to add any more dependencies to the project. All you need is a working application. Runnpm startto see if the app is running properly.
Once the application is running and ready to deploy, we are ready to start Dockerizing it!
How to Write a Dockerfile
To build an image of your application, you need to specify instructions for the same in a Dockerfile. The instructions from this file will be executed one after the other. You'll find a reference to all the instructions here .
A Docker image consists of different layers stacked on top of each other. Each instruction in the Dockerfile adds a new layer on top of the existing ones. Each layer in the image is stored as a SHA-256 hash.
Note that not all instructions create new layers. Certain instructions likeLABEL,ENV, andARGare only set to provide some metadata for the image. Read this to learn more about image layers.
Let's go over the instructions we'll need, one by one.
FROM node:18-alpine
This instruction pushes the base image from a remote repository (in this case, the Docker Hub) and defines the starting point for the image layers. The syntax for specifying the image is :
Since React is a Node-based application, we'll pull a Node image from the repository. Specify the version of the image you want to pull. You can get a list of versions here .
If you specify latest, it will pull the latest version – that is whenever the image is upgraded, it will always fetch the latest one. But this is not a good practice for applications deployed in production.
WORKDIR /react-docker-example/This command sets the working directory for any commands you add in the Dockerfile. So, while building the image, the commands will be executed in this directory.
COPY public/ /react-docker-example/public
COPY src/ /react-docker-example/src
COPY package.json /react-docker-example/
These instructions will copy the files we need into the working directory. We only need the public and src folders (where your code resides), and the package.json file to run the application.
RUN npm installTheRUNinstruction executes any command by adding a new layer on top of the current ones, thus modifying the image. This modified image will be used for the next steps.
In this case, it installs all the dependencies specified in thepackage.jsonfile. This is why we did not copy thenode_modulesfolder into the working directory. The folder will be created after this command gets executed.
CMD ["npm", "start"]This instruction defines the command that will be executed when starting a container from the image. There can only be oneCMDinstruction in the Dockerfile. If there are more than one, then only the last one will be considered.
Sincenpm startis the command used for starting a React app, we'll specify the same for running the container.
How to Build the Image
Now that we have written the Dockerfile, it's time to build the image. Open your terminal (or cmd in Windows) and execute the following command.
docker image build -t : -toption specifies the name and tag for the image.
We'll name the image react-docker-example and give it a taglatest. Make sure you change into the project's root directory usingcd react-docker-examplebefore executing the command.
docker image build -t react-example-image:latest .The.at the end represents the current directory.
Once you hit enter, this command will execute each instruction in the Dockerfile one by one.

In the above image, you can see that each instruction in the Dockerfile is getting executed in a new layer on top of the previous ones. In the end, the image is represented by a single sha256 hash which is the image id.
Now, rundocker imagesto see a list of images in your system. You'll see the details of the image you just created.
That's all it takes to build a Docker image: a few instructions in a Dockerfile and one command.
How to Push the Image to Docker Hub
Now, the image that you created resides in your local system. But what if you want to make it accessible to your team members? Similar to Git, you would need to push the image to a remote repository.
Docker Hub is a repository (or registry) where you can push your image as well as access other open source images. Similar to Node, there are other base images such as Ubuntu, Python, Redis, and so on. Check them out here .
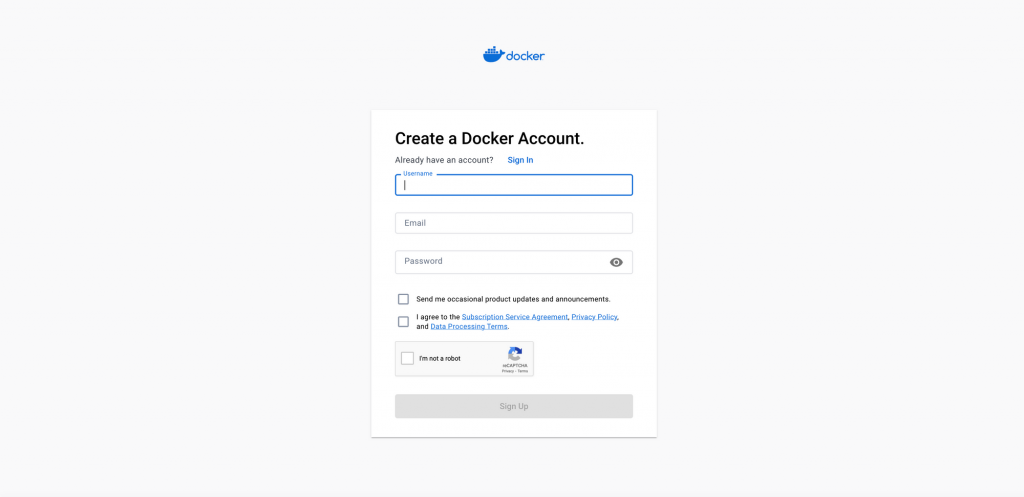
To start using Docker Hub , you first need to create an account.
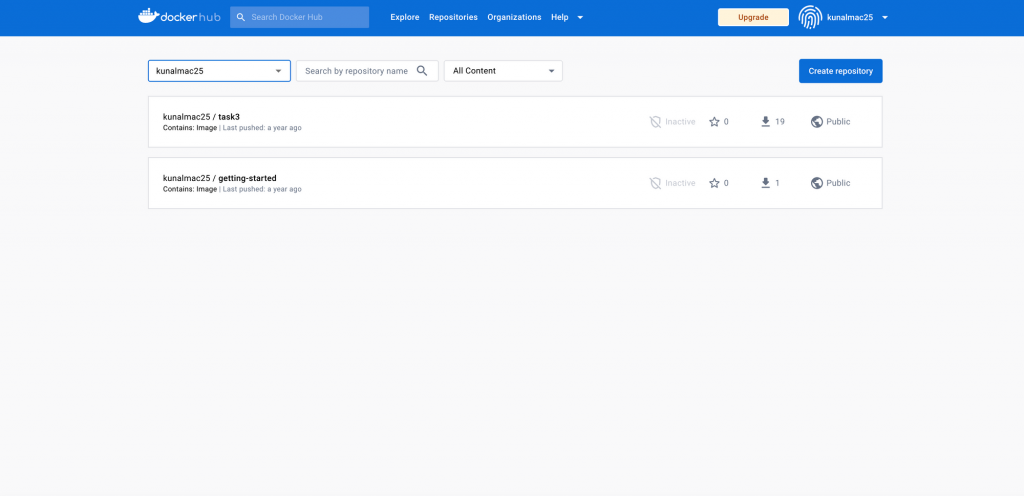
Then, go to repositories and click on Create repository.
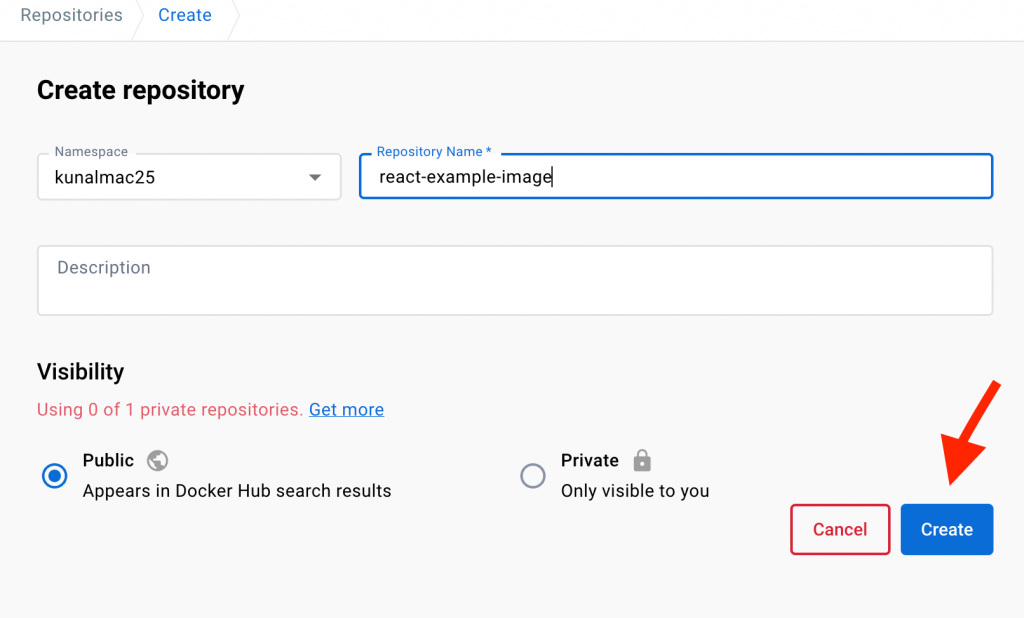
Specify a repository name and mark it public or private. In the community edition, you are only allowed to have 1 private repository. Click on Create.
Now, this is how your repository looks. You can push your image into this repository. Since this is a public repository, anyone can pull your images. But only you have the permission to push.
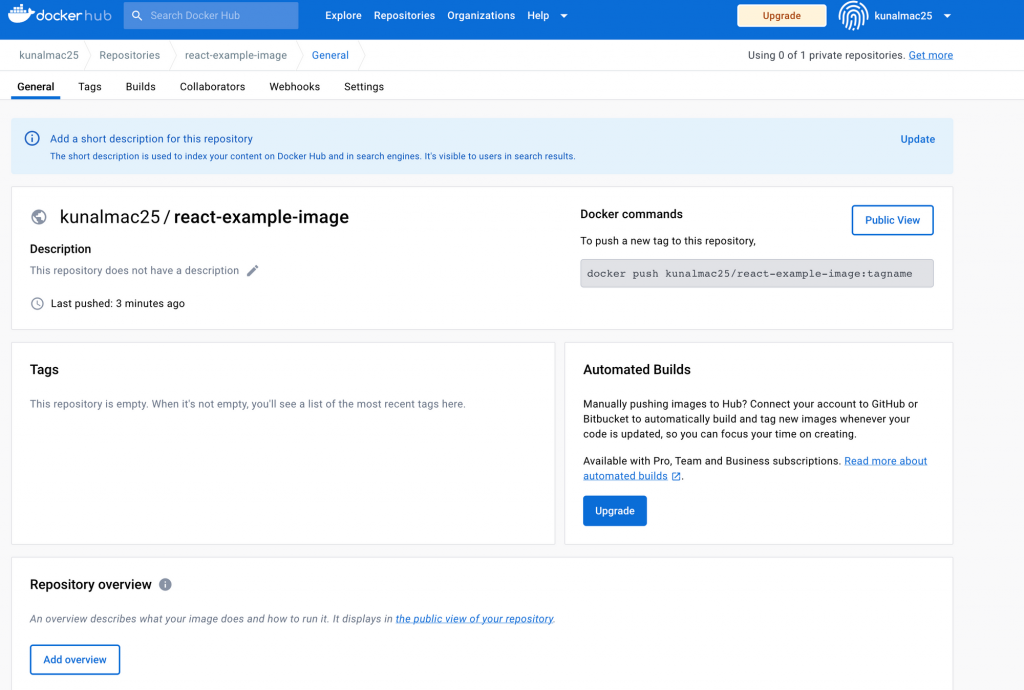
Now that you have created your remote repository, it's time to push your image. First, you need to login using your credentials.
docker loginAfter this, tag the image with your username.
docker image tag react-example-image /react-example-image Now, run this command to push the image.
docker push kunalmac25/react-example-imageSince you have not specified an image tag (that is, a version), it will use the default one – the latest. Unlike the version tag, it is necessary to tag the image name with your username. This gives you the complete ownership of the image and prevents any potential naming conflicts.
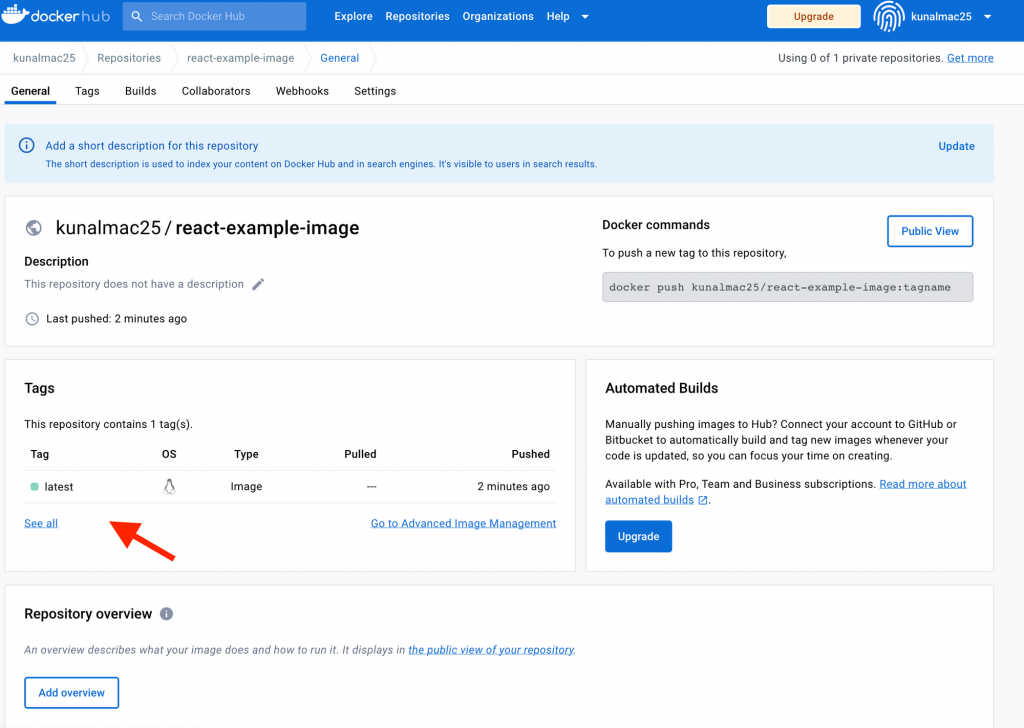
The latest version of your image has been pushed into the repository. Let's say, in the future, you have made changes to your application. You can create an upgraded version of the same image, tag it with the new version name and then, push it.
docker image build -t react-example-image:upgrade .docker image tag react-example-image:upgrade /react-example-image:upgrade docker push kunalmac25/react-example-image:upgradeNow, open your repository and check the images.
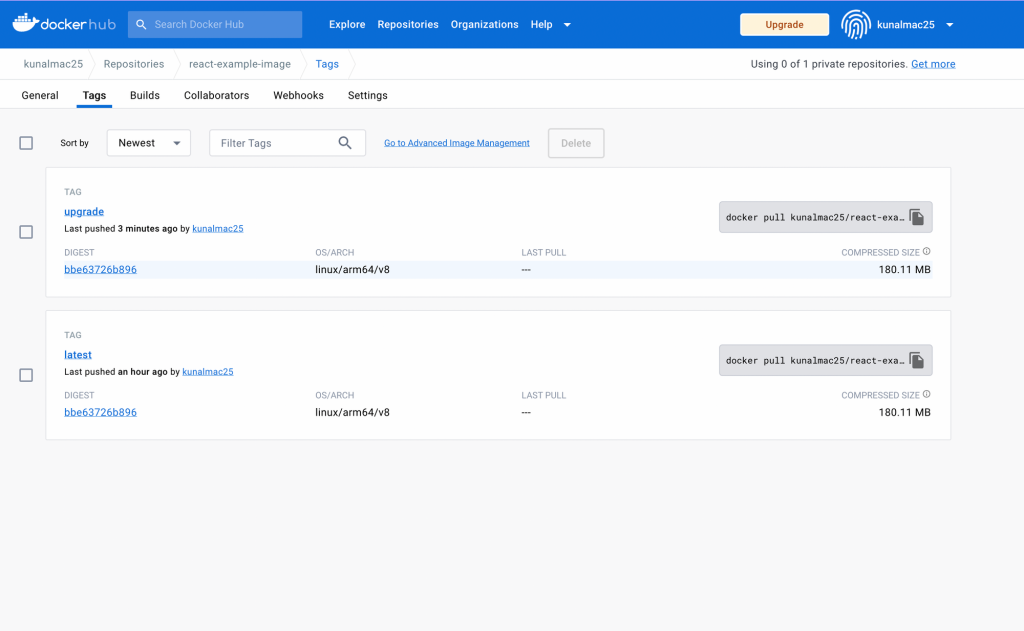
How to Create a Container from the Image
At this point, we have bundled package including everything needed to run the React application. Now, we need to create a container to run your application. Run the following command.
docker run -dp 8000:3000 --name react-example-container react-docker-example:latest-druns the container in detached mode – that is, it will run in the background and not display the running process on your terminal.-pmaps the port in the form: - The
--nameflag specifies the name for the container. - After these, you specify the image name and tag.
If the image does not exist on your local system, it will try to find the image in the Docker registry.
To check this, delete your local image usingdocker image rm react-example-imageand run the above command. Since there is an image with the same name on Docker Hub (the one you just pushed), it will download the image and create a container out of it.
Now, rundocker psordocker container psto show a list of all the running containers.

Now, open your browser and go tohttp://localhost:8000. You'll be able to access your application.
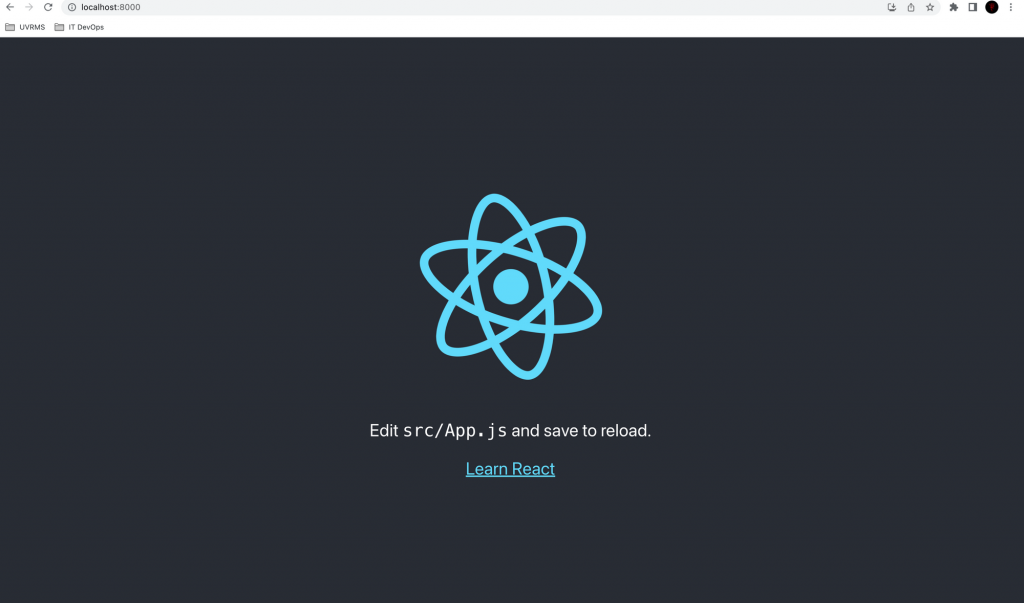
To stop a running container, use thedocker stopcommand with the container id or name.
docker stop Now, if you rundocker ps, it won't show the container as it only shows the running ones. If you want to see all the containers, including the non-running ones, usedocker ps -a.
Also, navigate to the same URL and you won't be able to see anything since the container is not running. To restart the container, rundocker start .
To remove the container, use thedocker rmcommand followed by the container id or name.
docker rm Congratulations! You have just run the application in an isolated environment where no other process is going to interfere with it. This makes your application faster and more reliable. Containers are extremely lightweight, so you can easily scale up the application.
Also, you do not need to worry about missing dependencies or conflicting versions. All the dependencies that your application needs are bundled inside the container. That's the beauty of containers!
