ChatGPT-4.5 vs Grok 3: Coding comparison

So, Grok 3 and ChatGPT-4.5 are finally here. Two of the most advanced AI models, both claiming to be...
So, Grok 3 and ChatGPT-4.5 are finally here. Two of the most advanced AI models, both claiming to be smarter, faster, and better than ever. But which one actually delivers?
Grok 3, released onFebruary 17, 2025, is xAI’s latest model. It’s built to be more conversational, sharper at coding, and deeply integrated with X (formerly Twitter). It promises real-time insights and a more interactive experience.
ChatGPT-4.5, launched onFebruary 27, 2025, takes reasoning, problem-solving, and memory to the next level. OpenAI calls it their most capable model yet, designed to handle technical and creative tasks with greater accuracy.
Numbers and benchmarks only tell part of the story. What really matters is how well these AIs perform in real-world scenarios. Can they solve tough coding challenges? Do they actually understand complex problems, or just generate convincing answers?
To find out, I am putting both models to the test. Let’s see which one truly stands out.
Table of Contents
If you just want the results, Grok 3 outperforms ChatGPT-4.5 in real-world coding tasks. It delivers cleaner code, better physics simulations, and a more polished UI. ChatGPT-4.5? Not even close. It struggled with execution, gave blank screens, and felt half-baked.
And yeah, that checks out. Grok 3 is built for coding and problem-solving, while ChatGPT-4.5 is still in beta and clearly needs more work.
Grok 3 System Card
Grok 3 was released by Elon Musk’s xAI. It is designed for advanced coding tasks and logical reasoning. It focuses on code generation and debugging. It improves multi-step problem-solving and delivers faster context-aware responses.
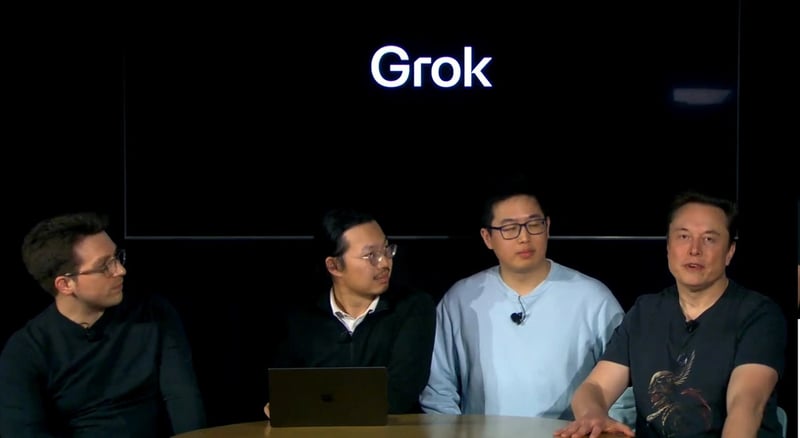
It comes in four modes, each with a unique purpose. Grok 3 Mini is for quick answers. Grok 3 Think Mode boosts logical reasoning. Grok 3 Big Brain Mode handles complex coding. Grok 3 DeepSearch digs deep into data.
To access Grok 3 modes, users need an X Premium+ subscription, priced at $40 per month. Those who want more power can opt for SuperGrok at $30 per month, unlocking extra features.
One of its most debated features is theUnhinged Voice Mode. This gives Grok 3 a bold, sarcastic personality. Some users love the humor. Others think it makes AI unpredictable. The debate is ongoing: Should AI be fun, or should it just stick to facts?
Grok 3 performs well in benchmarks. It scored 75 in Science and leads in technical problem-solving. It got 57 in Coding and proved its programming skills.
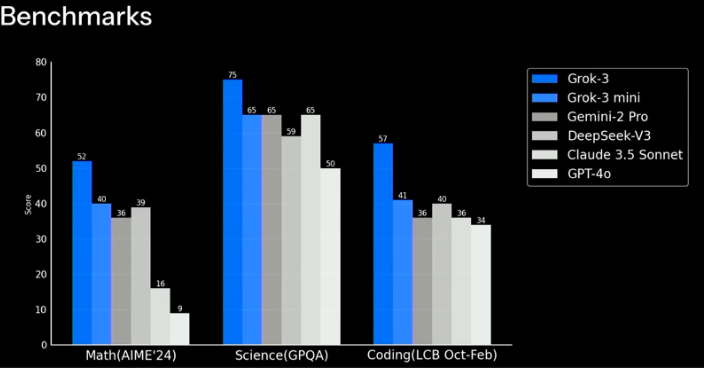
In Math, it scored 52 and beat some models but still fell behind the best. Grok 3 Mini scored lower but held its ground against Gemini-2 Pro and DeepSeek-V3.
With fast responses, strong coding skills, and a personality that sparks debate, Grok 3 brings something different to the AI race. The real test is how well it handles actual coding challenges. That is where it must prove itself.
ChatGPT-4.5 System Card
ChatGPT-4.5 was released by OpenAI on February 27, 2025. It is designed for advanced reasoning, coding, and problem-solving. It improves memory and provides more accurate responses. It handles complex technical tasks with better efficiency.
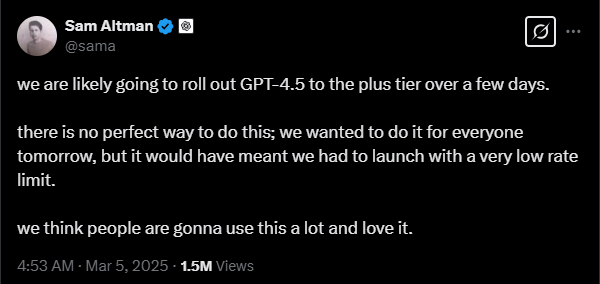
At launch, ChatGPT-4.5 was only available for Pro users. Sam Altman later announced that it would be available for Plus users as well. ChatGPT Plus costs $20 per month and provides access to the latest model with faster responses. ChatGPT Pro costs $200 per month and offers higher usage limits with priority access.
The biggest upgrade in ChatGPT-4.5 is its ability to handle multi-step reasoning and logic-based problems. It is better at coding and debugging. It also improves data analysis and creative writing. It generates more natural and context-aware responses.
ChatGPT-4.5 is a powerful AI for developers, researchers, and businesses. Its value depends on how much reasoning, coding, and deep problem-solving matter to the user.
ChatGPT vs Grok
ChatGPT-4.5 is built on GPT-4 and GPT-4o. It has better reasoning and coding skills. OpenAI has improved its AI models over time.
Grok models are newer but improving fast. The chart shows Grok 0 launched in 2023. It was followed by Grok 1, Grok 1.5, and Grok 2. Grok 3 has made big improvements.
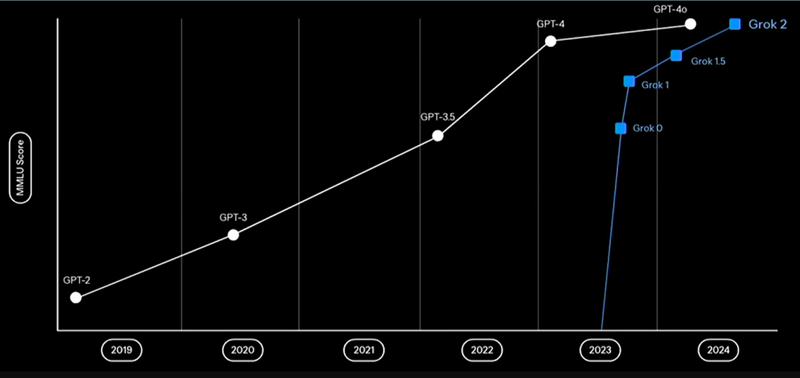
GPT-4o still has the highest MLU score. ChatGPT-4.5 is expected to be even better. Grok 3 is getting stronger but still needs time to catch up. ChatGPT-4.5 is ahead for now. If Grok keeps growing this fast, it might close the gap soon.
Coding Challenge
AI models are getting better at coding, but how well do they handle real-world programming challenges? To find out, I tested Grok 3 and ChatGPT-4.5 with three complex coding tasks. Each challenge requires logic, creativity, and technical skills.
1. Physics-Based Square in a Spinning Circle
Let’s see how well the AI models handle real-world physics. The task was to create a 2D simulation where a square moves inside a spinning circular container. The square needed to follow gravity, bounce off walls, and react to the spinning motion.
prompt:
Create a 2D physics simulation in Pygame where a square moves inside a spinning circular container. The square must follow gravity, collisions, and friction, reacting naturally by tumbling, sliding, and bouncing.
Grok 3 Response:
import pygame
import math
import numpy as np

# Initialize Pygame
pygame.init()

# Screen settings
WIDTH = 800
HEIGHT = 800
screen = pygame.display.set_mode((WIDTH, HEIGHT))
pygame.display.set_caption("Spinning Container Physics Simulation")
clock = pygame.time.Clock()

# Colors
WHITE = (255, 255, 255)
RED = (255, 0, 0)
BLUE = (0, 0, 255)

# Physics constants
GRAVITY = 0.5
FRICTION = 0.98
RESTITUTION = 0.7 # Bounce factor

class Square:
 def __init__(self, x, y, size):
 self.pos = np.array([float(x), float(y)])
 self.vel = np.array([0.0, 0.0])
 self.angle = 0.0
 self.angular_vel = 0.0
 self.size = size
 self.mass = 1.0
 self.moment_of_inertia = (self.mass * size * size) / 6.0

 def get_corners(self):
 # Calculate the four corners of the square based on position and angle
 half_size = self.size / 2
 corners = [
 np.array([-half_size, -half_size]),
 np.array([half_size, -half_size]),
 np.array([half_size, half_size]),
 np.array([-half_size, half_size])
 ]
 # Rotate and translate corners
 rotated_corners = []
 for corner in corners:
 rotated_x = corner[0] * math.cos(self.angle) - corner[1] * math.sin(self.angle)
 rotated_y = corner[0] * math.sin(self.angle) + corner[1] * math.cos(self.angle)
 rotated_corners.append(self.pos + np.array([rotated_x, rotated_y]))
 return rotated_corners

 def draw(self, surface, offset_angle=0):
 corners = self.get_corners()
 # Apply container rotation offset
 rotated_corners = []
 for corner in corners:
 centered = corner - np.array([WIDTH/2, HEIGHT/2])
 rot_x = centered[0] * math.cos(offset_angle) - centered[1] * math.sin(offset_angle)
 rot_y = centered[0] * math.sin(offset_angle) + centered[1] * math.cos(offset_angle)
 rotated_corners.append((rot_x + WIDTH/2, rot_y + HEIGHT/2))
 pygame.draw.polygon(surface, RED, rotated_corners)

class Container:
 def __init__(self, radius):
 self.radius = radius
 self.angle = 0.0
 self.angular_vel = 0.05 # Rotation speed

 def update(self):
 self.angle += self.angular_vel

 def draw(self, surface):
 # Draw container outline
 pygame.draw.circle(surface, BLUE, (WIDTH//2, HEIGHT//2), self.radius, 2)
 # Draw a reference line to show rotation
 end_x = WIDTH/2 + self.radius * math.cos(self.angle)
 end_y = HEIGHT/2 + self.radius * math.sin(self.angle)
 pygame.draw.line(surface, BLUE, (WIDTH/2, HEIGHT/2), (end_x, end_y), 2)

def handle_collision(square, container):
 corners = square.get_corners()
 center = np.array([WIDTH/2, HEIGHT/2])

 for corner in corners:
 # Distance from container center to corner
 dist_vec = corner - center
 dist = np.linalg.norm(dist_vec)

 if dist >= container.radius:
 # Collision detected
 normal = dist_vec / dist # Normal vector pointing outward
 penetration = dist - container.radius

 # Move square back to prevent penetration
 square.pos -= normal * penetration

 # Reflect velocity
 relative_vel = square.vel + square.angular_vel * np.array([-normal[1], normal[0]]) * square.size/2
 vel_along_normal = np.dot(relative_vel, normal)

 if vel_along_normal < 0: # Moving into wall
 impulse = -(1 + RESTITUTION) * vel_along_normal / (1/square.mass + (square.size/2)**2/square.moment_of_inertia)

 # Apply linear impulse
 square.vel += impulse * normal / square.mass

 # Apply angular impulse
 r = corner - square.pos
 cross = r[0] * normal[1] - r[1] * normal[0]
 square.angular_vel += impulse * cross / square.moment_of_inertia

def main():
 container = Container(300)
 square = Square(WIDTH/2, HEIGHT/2 - 200, 50)

 running = True
 while running:
 for event in pygame.event.get():
 if event.type == pygame.QUIT:
 running = False

 # Update container
 container.update()

 # Apply gravity (adjusted for container rotation)
 gravity_dir = np.array([0, GRAVITY])
 rotated_gravity = np.array([
 gravity_dir[0] * math.cos(container.angle) - gravity_dir[1] * math.sin(container.angle),
 gravity_dir[0] * math.sin(container.angle) + gravity_dir[1] * math.cos(container.angle)
 ])
 square.vel += rotated_gravity

 # Update square physics
 square.pos += square.vel
 square.angle += square.angular_vel

 # Apply friction
 square.vel *= FRICTION
 square.angular_vel *= FRICTION

 # Handle collision
 handle_collision(square, container)

 # Draw everything
 screen.fill(WHITE)
 container.draw(screen)
 square.draw(screen, container.angle)
 pygame.display.flip()

 clock.tick(60)

 pygame.quit()

if __name__ == "__main__":
 main()
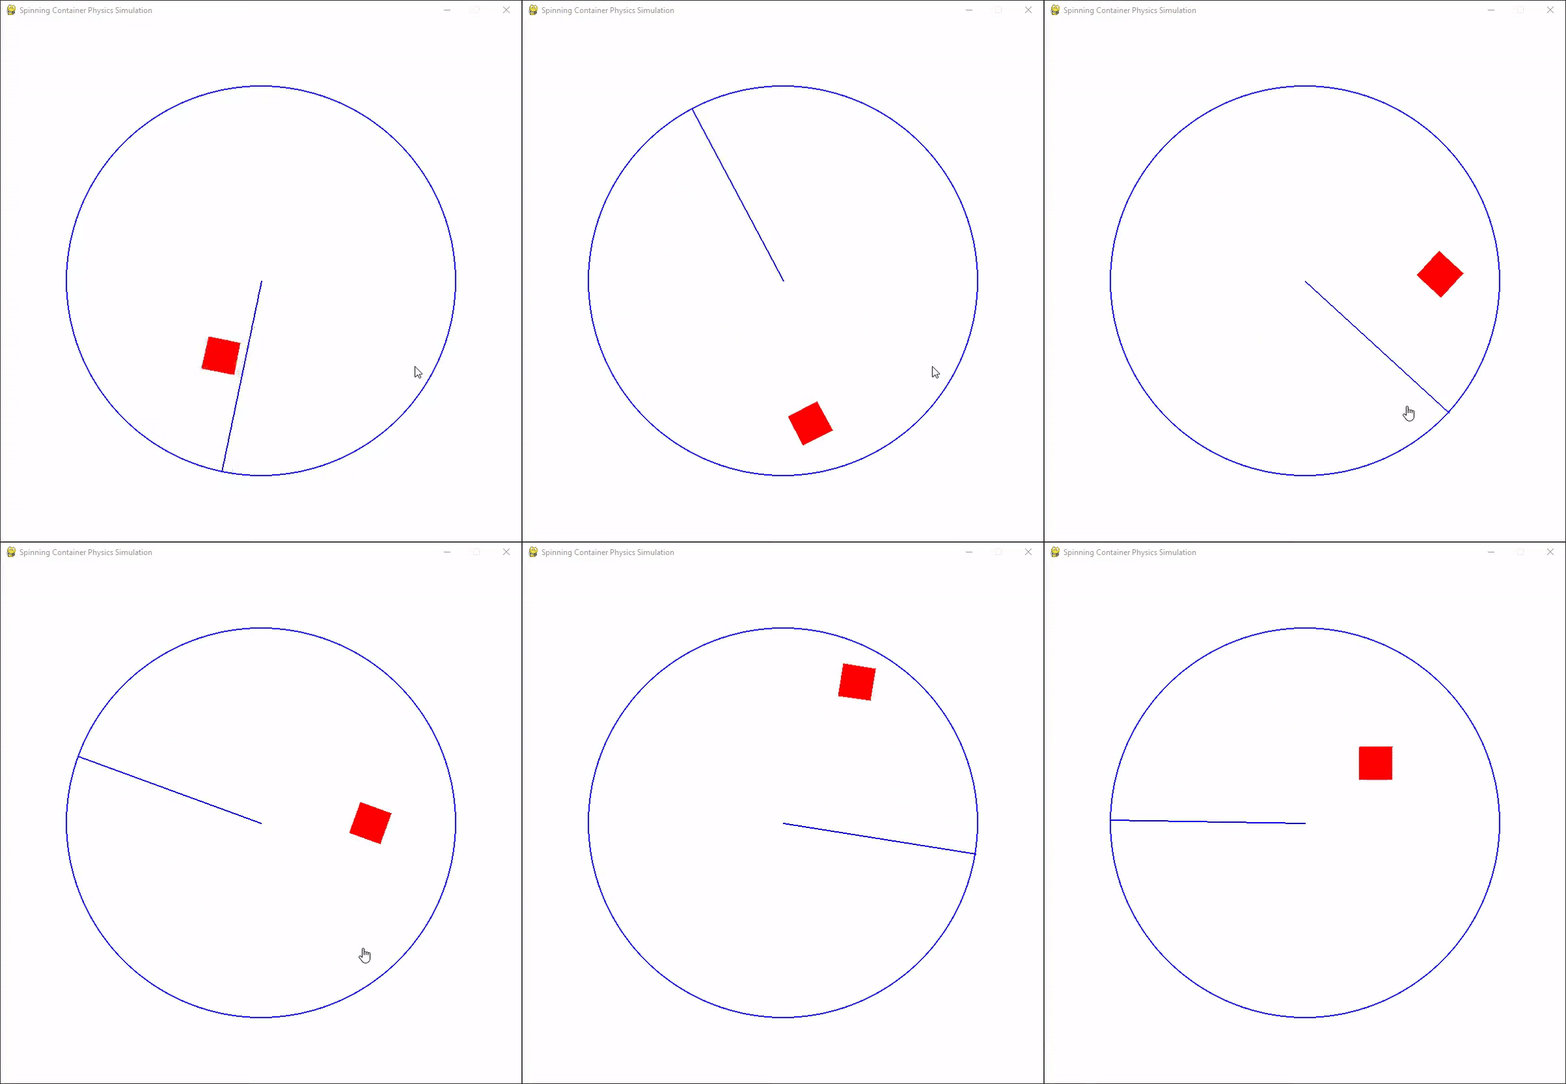
Here's the output of the program:
ChatGPT 4.5 Response
import pygame
import pymunk
import pymunk.pygame_util
import math

# Initialization
pygame.init()
WIDTH, HEIGHT = 800, 800
window = pygame.display.set_mode((WIDTH, HEIGHT))
pygame.display.set_caption("Ball in a Spinning Circle - Physics Simulation")

fps = 60
clock = pygame.time.Clock()

# Physics Setup
space = pymunk.Space()
space.gravity = (0, 980) # downward gravity (pixels per second squared)

draw_options = pymunk.pygame_util.DrawOptions(window)

# Container Parameters
circle_radius = 300
circle_thickness = 10

# Create the spinning container as a kinematic body (manually controlled rotation)
container_body = pymunk.Body(body_type=pymunk.Body.KINEMATIC)
container_body.position = WIDTH / 2, HEIGHT / 2

# Important fix: Add container_body to the physics space
space.add(container_body)

# Define the circle shape by multiple small segments (better collision detection)
segments = 60
angles_step = 2 * math.pi / segments

for i in range(segments):
 angle_start = angles_step * i
 angle_end = angles_step * (i + 1)
 x1 = circle_radius * math.cos(angle_start)
 y1 = circle_radius * math.sin(angle_start)
 x2 = circle_radius * math.cos(angle_end)
 y2 = circle_radius * math.sin(angle_end)
 segment_shape = pymunk.Segment(container_body, (x1, y1), (x2, y2), circle_thickness)
 segment_shape.elasticity = 0.8
 segment_shape.friction = 0.8
 space.add(segment_shape)

# Create the ball inside the container
ball_radius = 20
ball_mass = 2
ball_inertia = pymunk.moment_for_circle(ball_mass, 0, ball_radius)
ball_body = pymunk.Body(ball_mass, ball_inertia)
ball_body.position = WIDTH / 2, HEIGHT / 2
ball_shape = pymunk.Circle(ball_body, ball_radius)
ball_shape.elasticity = 0.8
ball_shape.friction = 0.6
space.add(ball_body, ball_shape)

# Simulation parameters
rotation_speed = 0.5 # radians per second

# Main loop
running = True
angle = 0

while running:
 dt = clock.tick(fps) / 1000.0 # time step in seconds

 # Check for quit
 for event in pygame.event.get():
 if event.type == pygame.QUIT:
 running = False

 # Spin the container continuously
 angle += rotation_speed * dt
 container_body.angle = angle

 # Update physics simulation
 space.step(dt)

 # Drawing
 window.fill((255, 255, 255))
 space.debug_draw(draw_options) # easy built-in visual debugging

 pygame.display.flip()

pygame.quit()
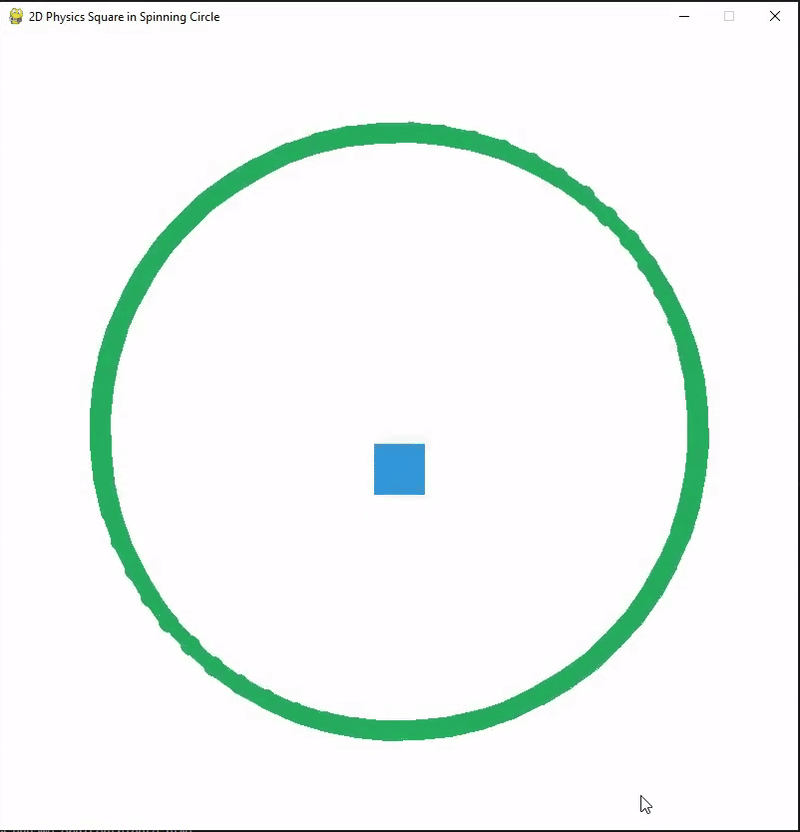
Here's the output of the program:
Summary
Grok 3 gave it a shot. The square bounced, spun, and reacted, even if it wasn’t perfect. ChatGPT-4.5 just dropped the square in the center like physics didn’t even matter, which was honestly disappointing.
2. Dynamic 3D Shifting Panels Animation in JavaScript
Let’s try a simple space animation and see if the AI models can handle it.
This isn’t a complex challenge, just drifting planets, soft lighting, and twinkling stars. I expected both models to get it right without issues. Grok 3 seems promising, but after ChatGPT-4.5’s last performance, I’m not too confident. Let’s see what happens.
Prompt:
Create a 3D animation of planets drifting in space using Three.js. The scene should feature a few planets of different sizes and colors, slowly moving in a natural, floating motion. Each planet should rotate gently, with soft lighting that highlights their surfaces. A glowing central star should cast light, creating subtle shadows and reflections. The background must include twinkling stars that fade in and out at different speeds, adding depth. The camera should pan slowly, providing a dynamic but smooth view of the planets without rapid movements.
Grok 3 Response
<!DOCTYPE html>
<html>
<head>
 <title>Planet Animation</title>
 <style>
 body { margin: 0; overflow: hidden; }
 canvas { display: block; }
 </style>
</head>
<body>
 <!-- Include Three.js from CDN -->
 <script src="https://cdnjs.cloudflare.com/ajax/libs/three.js/r134/three.min.js"></script>
 <script>
 // Scene setup
 const scene = new THREE.Scene();
 const camera = new THREE.PerspectiveCamera(75, window.innerWidth / window.innerHeight, 0.1, 1000);
 const renderer = new THREE.WebGLRenderer({ antialias: true });
 renderer.setSize(window.innerWidth, window.innerHeight);
 document.body.appendChild(renderer.domElement);

 // Lighting
 const starLight = new THREE.PointLight(0xffffff, 1.5, 100);
 starLight.position.set(0, 0, 0);
 scene.add(starLight);

 const ambientLight = new THREE.AmbientLight(0x404040, 0.2);
 scene.add(ambientLight);

 // Create planets
 const planets = [
 {
 radius: 2,
 color: 0x4287f5, // Blue planet
 position: new THREE.Vector3(5, 0, -10),
 rotationSpeed: 0.01,
 orbitSpeed: 0.002
 },
 {
 radius: 1.5,
 color: 0xf54242, // Red planet
 position: new THREE.Vector3(-7, 2, -15),
 rotationSpeed: 0.015,
 orbitSpeed: 0.003
 },
 {
 radius: 3,
 color: 0x42f548, // Green planet
 position: new THREE.Vector3(8, -1, -20),
 rotationSpeed: 0.008,
 orbitSpeed: 0.001
 }
 ];

 // Planet meshes
 const planetMeshes = planets.map(planet => {
 const geometry = new THREE.SphereGeometry(planet.radius, 32, 32);
 const material = new THREE.MeshPhongMaterial({ color: planet.color });
 const mesh = new THREE.Mesh(geometry, material);
 mesh.position.copy(planet.position);
 return { mesh, ...planet };
 });

 // Central star
 const starGeometry = new THREE.SphereGeometry(1, 32, 32);
 const starMaterial = new THREE.MeshBasicMaterial({ color: 0xffff00 });
 const star = new THREE.Mesh(starGeometry, starMaterial);
 scene.add(star);

 // Starfield background
 const starCount = 1000;
 const starGeometryField = new THREE.BufferGeometry();
 const starPositions = new Float32Array(starCount * 3);
 const starOpacities = new Float32Array(starCount);

 for (let i = 0; i < starCount; i++) {
 starPositions[i * 3] = (Math.random() - 0.5) * 200;
 starPositions[i * 3 + 1] = (Math.random() - 0.5) * 200;
 starPositions[i * 3 + 2] = (Math.random() - 0.5) * 200;
 starOpacities[i] = Math.random();
 }

 starGeometryField.setAttribute('position', new THREE.BufferAttribute(starPositions, 3));
 starGeometryField.setAttribute('opacity', new THREE.BufferAttribute(starOpacities, 1));

 const starMaterialField = new THREE.PointsMaterial({
 color: 0xffffff,
 size: 0.1,
 transparent: true,
 opacity: 0.8,
 vertexColors: false
 });

 const starfield = new THREE.Points(starGeometryField, starMaterialField);
 scene.add(starfield);

 // Camera position
 camera.position.set(0, 5, 15);
 camera.lookAt(0, 0, 0);

 // Animation
 let time = 0;
 function animate() {
 requestAnimationFrame(animate);

 // Planet rotation and orbit
 planetMeshes.forEach(planet => {
 scene.add(planet.mesh);

 // Self rotation
 planet.mesh.rotation.y += planet.rotationSpeed;

 // Orbital movement
 time += planet.orbitSpeed;
 planet.mesh.position.x = planet.position.x * Math.cos(time) + planet.position.z * Math.sin(time);
 planet.mesh.position.z = planet.position.z * Math.cos(time) - planet.position.x * Math.sin(time);
 });

 // Star twinkling
 const opacities = starGeometryField.attributes.opacity.array;
 for (let i = 0; i < starCount; i++) {
 opacities[i] = Math.sin(Date.now() * 0.001 + i) * 0.5 + 0.5;
 }
 starGeometryField.attributes.opacity.needsUpdate = true;

 // Camera panning
 camera.position.x = Math.sin(Date.now() * 0.0001) * 20;
 camera.position.z = Math.cos(Date.now() * 0.0001) * 15 + 10;
 camera.lookAt(0, 0, 0);

 renderer.render(scene, camera);
 }

 // Window resize handler
 window.addEventListener('resize', () => {
 camera.aspect = window.innerWidth / window.innerHeight;
 camera.updateProjectionMatrix();
 renderer.setSize(window.innerWidth, window.innerHeight);
 });

 animate();
 </script>
</body>
</html>
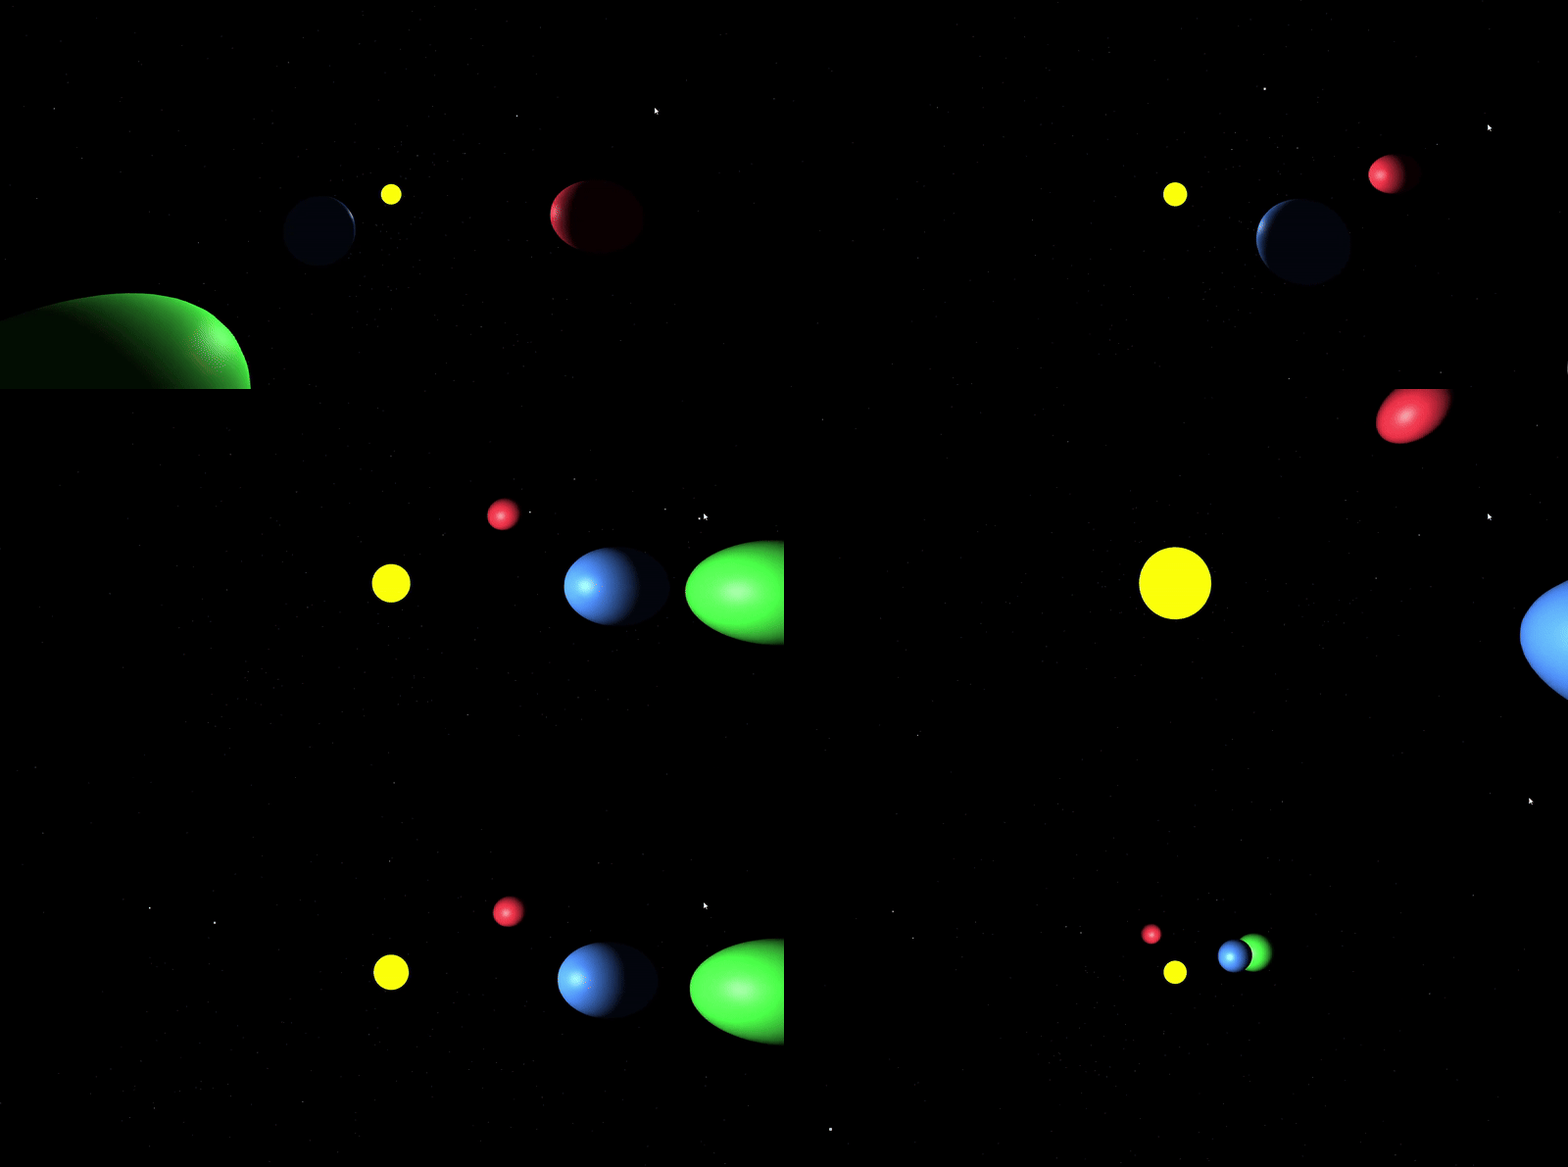
Here's the output of the program:
ChatGPT 4.5 Response:
<!DOCTYPE html>
<html lang="en">
<head>
 <meta charset="UTF-8">
 <title>3D Planet Scene in Three.js</title>
 <style>
 body, html { margin: 0; overflow: hidden; background: black; }
 canvas { display: block; }
 </style>
</head>
<body>
<script src="https://cdnjs.cloudflare.com/ajax/libs/three.js/r162/three.min.js"></script>
<script>
// Scene Setup
const scene = new THREE.Scene();

// Camera Setup
const camera = new THREE.PerspectiveCamera(
 60, window.innerWidth / window.innerHeight, 0.1, 1000
);
camera.position.set(0, 5, 20);

// Renderer Setup
const renderer = new THREE.WebGLRenderer({ antialias: true });
renderer.setSize(window.innerWidth, window.innerHeight);
renderer.setPixelRatio(Math.min(window.devicePixelRatio,2));
document.body.appendChild(renderer.domElement);

// Lights
const ambient = new THREE.AmbientLight(0xffffff, 0.3);
scene.add(ambient);

const starLight = new THREE.PointLight(0xffddaa, 2, 100);
scene.add(starLight);

// Central Star
const starGeometry = new THREE.SphereGeometry(1.5, 32, 32);
const starMaterial = new THREE.MeshBasicMaterial({ color: 0xffcc66 });
const star = new THREE.Mesh(starGeometry, starMaterial);
scene.add(star);

// Planets Setup
const planets = [];
const planetData = [
 {size: 0.6, color: 0x44aaff, orbitDist: 5, speed: 0.007},
 {size: 1.0, color: 0xff5577, orbitDist: 8, speed: 0.005},
 {size: 0.8, color: 0x33ff88, orbitDist: 11, speed: 0.003},
];

planetData.forEach((data, i) => {
 const planetGeom = new THREE.SphereGeometry(data.size, 32, 32);
 const planetMat = new THREE.MeshStandardMaterial({ color: data.color });
 const planet = new THREE.Mesh(planetGeom, planetMat);
 planet.userData = {
 angle: Math.random() * Math.PI * 2,
 speed: data.speed,
 dist: data.orbitDist
 };
 planet.position.x = planet.userData.dist;
 scene.add(planet);
 planets.push(planet);
});

// Background Stars Setup
const starPositions = [];
const starAlphas = [];
for(let i = 0; i < 1000; i++){
 starPositions.push(
 THREE.MathUtils.randFloatSpread(200),
 THREE.MathUtils.randFloatSpread(200),
 THREE.MathUtils.randFloatSpread(200)
 );
 starAlphas.push(Math.random());
}

const starsGeometry = new THREE.BufferGeometry();
starsGeometry.setAttribute('position', new THREE.Float32BufferAttribute(starPositions,3));
starsGeometry.setAttribute('alpha', new THREE.Float32BufferAttribute(starAlphas,1));

const starsMaterial = new THREE.PointsMaterial({
 color: 0xffffff,
 transparent: true,
 opacity: 0.8,
 size: 0.5
});
const stars = new THREE.Points(starsGeometry, starsMaterial);
scene.add(stars);

// Animate Scene
function animate(){
 requestAnimationFrame(animate);

 // Planet movements and rotations
 planets.forEach(planet => {
 planet.userData.angle += planet.userData.speed;
 planet.position.x = planet.userData.dist * Math.cos(planet.userData.angle);
 planet.position.z = planet.userData.dist * Math.sin(planet.userData.angle);
 planet.rotation.y += 0.002;
 });

 // Twinkling Stars (fade opacity)
 const alphas = starsGeometry.getAttribute('alpha');
 for(let i = 0; i < alphas.count; i++){
 alphas.array[i] += 0.005 * (Math.random() - 0.5);
 alphas.array[i] = THREE.MathUtils.clamp(alphas.array[i], 0.1, 1);
 }
 alphas.needsUpdate = true;

 // Smooth camera pan around
 const timer = Date.now() * 0.00005;
 camera.position.x = 20 * Math.sin(timer);
 camera.position.z = 20 * Math.cos(timer);
 camera.lookAt(scene.position);

 renderer.render(scene, camera);
}
animate();

// Handle Resize
window.addEventListener('resize', () => {
 camera.aspect = window.innerWidth/window.innerHeight;
 camera.updateProjectionMatrix();
 renderer.setSize(window.innerWidth, window.innerHeight);
});
</script>
</body>
</html>
Here's the output of the program:

Summary
Grok 3 did exactly what I expected. The planets moved smoothly, the lighting worked well, and the animation felt complete. Everything came together without any issues.
ChatGPT-4.5 was a frustrating experience. No matter how many times I tried, it just gave me a blank screen. No movement. No animation. Nothing.
3. Modern Photo Editor App in Python
This time, I want to see if the AI models can build a fully functional photo editor with a clean and intuitive UI for easy image editing.
Prompt:
Create a Python-based photo editor using Tkinter and OpenCV that allows users to upload, edit, and save images. It should support free cropping, zooming, rotation, resizing, brightness/contrast adjustments, and filters with real-time previews. The UI must be modern and user-friendly, ensuring smooth editing and high-quality image exports.
Grok 3 Response
import tkinter as tk
from tkinter import filedialog, messagebox, ttk
import cv2
import numpy as np
from PIL import Image, ImageTk
import os

class PhotoEditor:
 def __init__(self, root):
 self.root = root
 self.root.title("Advanced Photo Editor")
 self.root.geometry("1200x800")
 self.root.configure(bg="#2d2d2d") # Dark theme

 # Initialize variables
 self.original_image = None
 self.current_image = None
 self.preview_image = None
 self.crop_start = None
 self.crop_rect = None
 self.is_cropping = False
 self.zoom_level = 1.0
 self.canvas_width = 900
 self.canvas_height = 700

 # Create GUI
 self.create_interface()

 def create_interface(self):
 # Main frame
 main_frame = ttk.Frame(self.root, padding="10")
 main_frame.pack(fill=tk.BOTH, expand=True)

 # Left control panel
 self.control_panel = ttk.Frame(main_frame, width=250, style="Dark.TFrame")
 self.control_panel.pack(side=tk.LEFT, fill=tk.Y, padx=5)

 # Upload button
 ttk.Button(self.control_panel, text="???? Upload Image", command=self.upload_image,
 style="Accent.TButton").pack(fill=tk.X, pady=5)

 # Zoom controls
 zoom_frame = ttk.LabelFrame(self.control_panel, text="Zoom", padding=5)
 zoom_frame.pack(fill=tk.X, pady=5)
 ttk.Button(zoom_frame, text="???? Zoom In", command=self.zoom_in,
 style="Tool.TButton").pack(fill=tk.X, pady=2)
 ttk.Button(zoom_frame, text="???? Zoom Out", command=self.zoom_out,
 style="Tool.TButton").pack(fill=tk.X, pady=2)

 # Editing tools frame
 tools_frame = ttk.LabelFrame(self.control_panel, text="Edit Tools", padding=5)
 tools_frame.pack(fill=tk.X, pady=5)

 ttk.Button(tools_frame, text="✂ Crop", command=self.start_crop,
 style="Tool.TButton").pack(fill=tk.X, pady=2)
 ttk.Button(tools_frame, text="???? Rotate 90°", command=self.rotate_image,
 style="Tool.TButton").pack(fill=tk.X, pady=2)
 ttk.Button(tools_frame, text="???? Resize (50%)", command=self.resize_image,
 style="Tool.TButton").pack(fill=tk.X, pady=2)

 # Filters frame
 filters_frame = ttk.LabelFrame(self.control_panel, text="Filters", padding=5)
 filters_frame.pack(fill=tk.X, pady=5)

 ttk.Button(filters_frame, text="⚫ Grayscale", command=self.apply_grayscale,
 style="Tool.TButton").pack(fill=tk.X, pady=2)
 ttk.Button(filters_frame, text="???? Sepia", command=self.apply_sepia,
 style="Tool.TButton").pack(fill=tk.X, pady=2)

 # Adjustments frame
 adjust_frame = ttk.LabelFrame(self.control_panel, text="Adjustments", padding=5)
 adjust_frame.pack(fill=tk.X, pady=5)

 ttk.Label(adjust_frame, text="☀ Brightness").pack()
 self.brightness_scale = ttk.Scale(adjust_frame, from_=-100, to=100, value=0,
 command=self.adjust_brightness, length=200)
 self.brightness_scale.pack(pady=2)

 ttk.Label(adjust_frame, text="◑ Contrast").pack()
 self.contrast_scale = ttk.Scale(adjust_frame, from_=-100, to=100, value=0,
 command=self.adjust_contrast, length=200)
 self.contrast_scale.pack(pady=2)

 # Action buttons
 ttk.Button(self.control_panel, text="↺ Reset", command=self.reset_image,
 style="Tool.TButton").pack(fill=tk.X, pady=10)
 ttk.Button(self.control_panel, text="???? Save Image", command=self.save_image,
 style="Accent.TButton").pack(fill=tk.X, pady=2)

 # Preview area
 self.preview_frame = ttk.Frame(main_frame, style="Dark.TFrame")
 self.preview_frame.pack(side=tk.RIGHT, fill=tk.BOTH, expand=True)

 self.canvas = tk.Canvas(self.preview_frame, width=self.canvas_width,
 height=self.canvas_height, bg="#3c3f41", highlightthickness=0)
 self.canvas.pack(pady=10, expand=True)

 # Bind crop and zoom events
 self.canvas.bind("<Button-1>", self.crop_start_event)
 self.canvas.bind("<B1-Motion>", self.crop_drag_event)
 self.canvas.bind("<ButtonRelease-1>", self.crop_end_event)
 self.canvas.bind("<MouseWheel>", self.zoom_with_wheel)

 # Style configuration
 style = ttk.Style()
 style.theme_use("clam")
 style.configure("Dark.TFrame", background="#2d2d2d")
 style.configure("Accent.TButton", background="#4a90e2", foreground="white")
 style.configure("Tool.TButton", background="#3c3f41", foreground="white")

 def upload_image(self):
 file_path = filedialog.askopenfilename(filetypes=[("Image files", "*.png *.jpg *.jpeg *.bmp")])
 if file_path:
 self.original_image = cv2.imread(file_path)
 self.current_image = self.original_image.copy()
 self.zoom_level = 1.0
 self.display_image()

 def display_image(self):
 if self.current_image is not None:
 # Convert to RGB and apply zoom
 img_rgb = cv2.cvtColor(self.current_image, cv2.COLOR_BGR2RGB)
 img_pil = Image.fromarray(img_rgb)
 w, h = img_pil.size
 new_size = (int(w * self.zoom_level), int(h * self.zoom_level))
 img_pil = img_pil.resize(new_size, Image.Resampling.LANCZOS)

 # Limit to canvas size
 max_size = (self.canvas_width, self.canvas_height)
 img_pil.thumbnail(max_size, Image.Resampling.LANCZOS)
 self.preview_image = ImageTk.PhotoImage(img_pil)

 self.canvas.delete("all")
 self.canvas.create_image(self.canvas_width//2, self.canvas_height//2,
 image=self.preview_image)
 if self.crop_rect:
 self.canvas.create_rectangle(*self.crop_rect, outline="red", width=2, tag="crop")

 def start_crop(self):
 self.is_cropping = True
 self.crop_start = None

 def crop_start_event(self, event):
 if self.is_cropping and self.current_image is not None:
 self.crop_start = (event.x, event.y)
 if self.crop_rect:
 self.canvas.delete("crop")

 def crop_drag_event(self, event):
 if self.is_cropping and self.crop_start:
 self.crop_rect = (self.crop_start[0], self.crop_start[1], event.x, event.y)
 self.canvas.delete("crop")
 self.canvas.create_rectangle(*self.crop_rect, outline="red", width=2, tag="crop")

 def crop_end_event(self, event):
 if self.is_cropping and self.crop_start:
 self.is_cropping = False
 x1, y1 = self.crop_start
 x2, y2 = event.x, event.y
 # Convert to image coordinates considering zoom
 img_h, img_w = self.current_image.shape[:2]
 disp_h, disp_w = self.preview_image.height(), self.preview_image.width()
 scale_x, scale_y = img_w/(disp_w/self.zoom_level), img_h/(disp_h/self.zoom_level)
 crop_area = (int(x1*scale_x), int(y1*scale_y), int(x2*scale_x), int(y2*scale_y))
 crop_area = (max(0, min(crop_area[0], crop_area[2])),
 max(0, min(crop_area[1], crop_area[3])),
 min(img_w, max(crop_area[0], crop_area[2])),
 min(img_h, max(crop_area[1], crop_area[3])))
 self.current_image = self.current_image[crop_area[1]:crop_area[3],
 crop_area[0]:crop_area[2]]
 self.crop_rect = None
 self.display_image()

 def zoom_in(self):
 self.zoom_level = min(self.zoom_level + 0.2, 3.0)
 self.display_image()

 def zoom_out(self):
 self.zoom_level = max(self.zoom_level - 0.2, 0.2)
 self.display_image()

 def zoom_with_wheel(self, event):
 if event.delta > 0:
 self.zoom_in()
 else:
 self.zoom_out()

 def rotate_image(self):
 if self.current_image is not None:
 self.current_image = cv2.rotate(self.current_image, cv2.ROTATE_90_CLOCKWISE)
 self.display_image()

 def resize_image(self):
 if self.current_image is not None:
 h, w = self.current_image.shape[:2]
 self.current_image = cv2.resize(self.current_image, (w//2, h//2),
 interpolation=cv2.INTER_AREA)
 self.display_image()

 def adjust_brightness(self, value):
 if self.original_image is not None:
 value = int(float(value))
 self.current_image = cv2.convertScaleAbs(self.original_image, beta=value)
 self.display_image()

 def adjust_contrast(self, value):
 if self.original_image is not None:
 value = float(value) / 100 + 1 # Scale to 0-2 range
 self.current_image = cv2.convertScaleAbs(self.original_image, alpha=value)
 self.display_image()

 def apply_grayscale(self):
 if self.current_image is not None:
 self.current_image = cv2.cvtColor(self.current_image, cv2.COLOR_BGR2GRAY)
 self.current_image = cv2.cvtColor(self.current_image, cv2.COLOR_GRAY2BGR)
 self.display_image()

 def apply_sepia(self):
 if self.current_image is not None:
 kernel = np.array([[0.272, 0.534, 0.131],
 [0.349, 0.686, 0.168],
 [0.393, 0.769, 0.189]])
 self.current_image = cv2.transform(self.current_image, kernel)
 self.current_image = np.clip(self.current_image, 0, 255).astype(np.uint8)
 self.display_image()

 def reset_image(self):
 if self.original_image is not None:
 self.current_image = self.original_image.copy()
 self.brightness_scale.set(0)
 self.contrast_scale.set(0)
 self.zoom_level = 1.0
 self.display_image()

 def save_image(self):
 if self.current_image is not None:
 file_path = filedialog.asksaveasfilename(
 defaultextension=".png",
 filetypes=[("PNG files", "*.png"), ("JPEG files", "*.jpg"), ("All files", "*.*")]
 )
 if file_path:
 cv2.imwrite(file_path, self.current_image)
 messagebox.showinfo("Success", "Image saved successfully!")

def main():
 root = tk.Tk()
 app = PhotoEditor(root)
 root.mainloop()

if __name__ == "__main__":
 main()
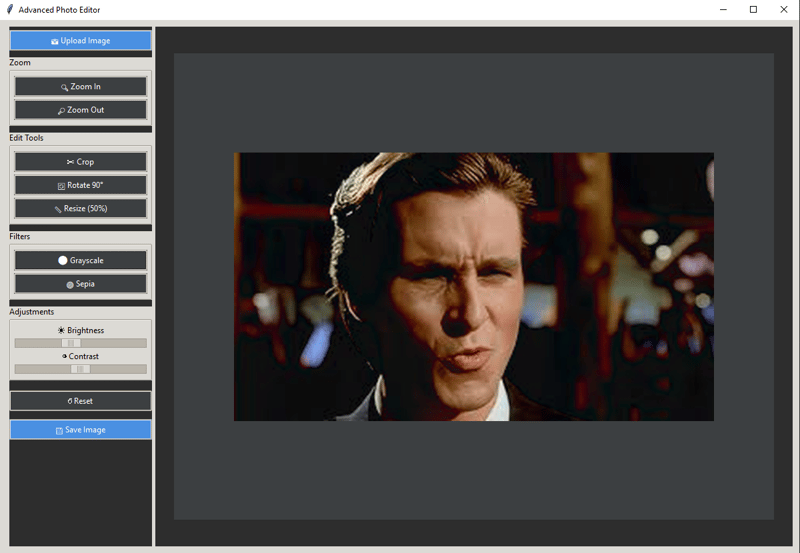
Here's the output of the program:
Chatgpt 4.5 Response:
import tkinter as tk
from tkinter import filedialog, ttk, messagebox
from PIL import Image, ImageTk, ImageEnhance
import cv2
import numpy as np

class PhotoEditor:
 def __init__(self, root):
 self.root = root
 self.root.title('Python Photo Editor')
 self.root.geometry('1200x800')
 self.root.configure(bg='#3a3a3a')

 self.canvas = tk.Canvas(self.root, cursor="cross", bg="#2b2b2b")
 self.canvas.pack(fill=tk.BOTH, expand=True)

 self.toolbar = ttk.Frame(self.root)
 self.toolbar.pack(side=tk.TOP, fill=tk.X, pady=5)

 self.image = None
 self.edited_image = None
 self.image_on_canvas = None
 self.zoom_level = 1.0

 # Crop rectangle variables
 self.crop_rect_id = None
 self.start_x = self.start_y = 0
 self.end_x = self.end_y = 0
 self.crop_mode = False

 self.create_ui()

 def create_ui(self):
 ttk.Button(self.toolbar, text='Open', command=self.open_image).pack(side=tk.LEFT, padx=5)
 ttk.Button(self.toolbar, text='Save', command=self.save_image).pack(side=tk.LEFT, padx=5)
 ttk.Button(self.toolbar, text='Crop', command=self.enable_crop).pack(side=tk.LEFT, padx=5)
 ttk.Button(self.toolbar, text='Rotate 90°', command=self.rotate_image).pack(side=tk.LEFT, padx=5)
 ttk.Button(self.toolbar, text='Brightness +', command=lambda:self.brightness_adjust(1.2)).pack(side=tk.LEFT, padx=5)
 ttk.Button(self.toolbar, text='Brightness -', command=lambda:self.brightness_adjust(0.8)).pack(side=tk.LEFT, padx=5)
 ttk.Button(self.toolbar, text='Contrast +', command=lambda:self.contrast_adjust(1.2)).pack(side=tk.LEFT, padx=5)
 ttk.Button(self.toolbar, text='Contrast -', command=lambda:self.contrast_adjust(0.8)).pack(side=tk.LEFT, padx=5)
 ttk.Button(self.toolbar, text='Grayscale', command=self.apply_grayscale).pack(side=tk.LEFT, padx=5)
 ttk.Button(self.toolbar, text='Sepia', command=self.apply_sepia).pack(side=tk.LEFT, padx=5)
 ttk.Button(self.toolbar, text='Zoom +', command=lambda: self.zoom(1.2)).pack(side=tk.LEFT, padx=5)
 ttk.Button(self.toolbar, text='Zoom -', command=lambda: self.zoom(0.8)).pack(side=tk.LEFT, padx=5)

 # Bind events for cropping
 self.canvas.bind("<ButtonPress-1>", self.crop_start)
 self.canvas.bind("<B1-Motion>", self.crop_drag)
 self.canvas.bind("<ButtonRelease-1>", self.crop_end)

 def open_image(self):
 file_path = filedialog.askopenfilename(filetypes=[("Image Files", "*.jpg *.jpeg *.png")])
 if file_path:
 self.image = Image.open(file_path).convert('RGB')
 self.edited_image = self.image.copy()
 self.zoom_level = 1.0
 self.display_image()

 def save_image(self):
 if self.edited_image:
 file_path = filedialog.asksaveasfilename(defaultextension='.png',
 filetypes=[("JPEG files","*.jpg"),("PNG files","*.png")])
 if file_path:
 self.edited_image.save(file_path)
 messagebox.showinfo('Saved', 'Image saved successfully')

 def display_image(self):
 self.canvas.delete('all')
 w, h = self.edited_image.size
 scaled_w, scaled_h = int(w*self.zoom_level), int(h*self.zoom_level)
 resized = self.edited_image.resize((scaled_w, scaled_h), Image.LANCZOS)
 self.tk_img = ImageTk.PhotoImage(resized)
 self.image_on_canvas = self.canvas.create_image(self.canvas.winfo_width()//2,
 self.canvas.winfo_height()//2,
 anchor='center', image=self.tk_img)

 def enable_crop(self):
 if self.edited_image:
 self.crop_mode = True
 self.canvas.config(cursor='tcross')

 def crop_start(self, event):
 if self.crop_mode:
 self.canvas.delete(self.crop_rect_id)
 self.start_x = self.canvas.canvasx(event.x)
 self.start_y = self.canvas.canvasy(event.y)
 self.crop_rect_id = self.canvas.create_rectangle(self.start_x, self.start_y,
 self.start_x, self.start_y,
 outline='yellow', width=2)

 def crop_drag(self, event):
 if self.crop_mode and self.crop_rect_id:
 self.end_x = self.canvas.canvasx(event.x)
 self.end_y = self.canvas.canvasy(event.y)
 self.canvas.coords(self.crop_rect_id, self.start_x, self.start_y, self.end_x, self.end_y)

 def crop_end(self, event):
 if self.crop_mode and self.edited_image:
 self.crop_mode = False
 self.canvas.config(cursor='arrow')

 bbox = (min(self.start_x, self.end_x), min(self.start_y, self.end_y),
 max(self.start_x, self.end_x), max(self.start_y, self.end_y))

 w, h = self.edited_image.size
 canvas_w, canvas_h = self.canvas.winfo_width(), self.canvas.winfo_height()

 x_ratio = w * self.zoom_level / canvas_w
 y_ratio = h * self.zoom_level / canvas_h

 real_bbox = [int(coord*self.zoom_level-x_ratio*self.canvas.winfo_width()/2+x_ratio*bbox[i%2])
 for i,coord in enumerate(bbox)]
 real_bbox = [max(0, min(w,h, c)) for c in real_bbox]

 self.edited_image = self.edited_image.crop(real_bbox)
 self.zoom_level = 1.0
 self.display_image()
 messagebox.showinfo('Cropped', 'Image cropped successfully')

 def rotate_image(self):
 if self.edited_image:
 self.edited_image = self.edited_image.rotate(-90, expand=True)
 self.display_image()

 def brightness_adjust(self, factor):
 if self.edited_image:
 enhancer = ImageEnhance.Brightness(self.edited_image)
 self.edited_image = enhancer.enhance(factor)
 self.display_image()

 def contrast_adjust(self, factor):
 if self.edited_image:
 enhancer = ImageEnhance.Contrast(self.edited_image)
 self.edited_image = enhancer.enhance(factor)
 self.display_image()

 def apply_grayscale(self):
 if self.edited_image:
 self.edited_image = self.edited_image.convert('L').convert('RGB')
 self.display_image()

 def apply_sepia(self):
 if self.edited_image:
 img = np.array(self.edited_image)
 sepia_filter = np.array([[0.393, 0.769, 0.189],
 [0.349, 0.686, 0.168],
 [0.272, 0.534, 0.131]])
 sepia = cv2.transform(img, sepia_filter)
 sepia = np.clip(sepia, 0, 255).astype(np.uint8)
 self.edited_image = Image.fromarray(sepia)
 self.display_image()

 def zoom(self, factor):
 if self.edited_image:
 self.zoom_level *= factor
 self.zoom_level = min(max(self.zoom_level, 0.1), 5.0)
 self.display_image()

if __name__ == '__main__':
 root = tk.Tk()
 editor = PhotoEditor(root)
 root.mainloop()
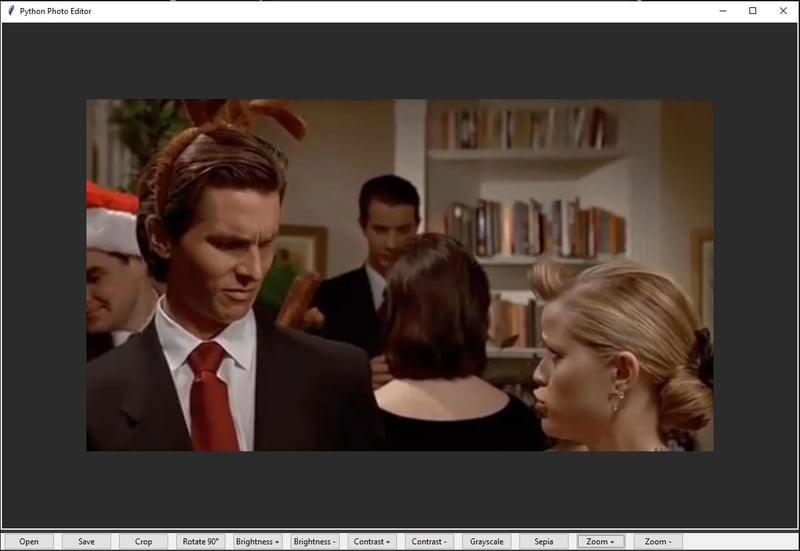
Here's the output of the program:
Summary
Both models got the job done, but the difference was obvious. Grok 3 had a modern, clean UI that felt smooth and well-designed. ChatGPT-4.5 just dumped all the features at the bottom with no real thought about layout or user experience. It worked, but it felt rushed and lacked creativity.
4. Procedural City Skyline Generator
I want to see if the AI models can create a dynamic and visually appealing city skyline using Python.
Prompt:
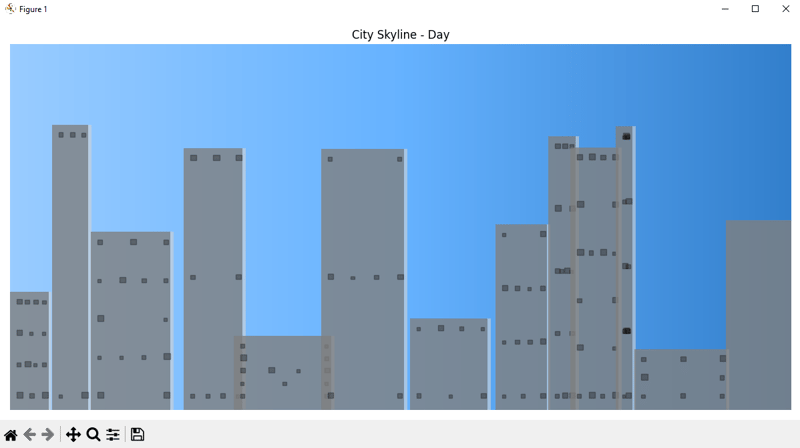
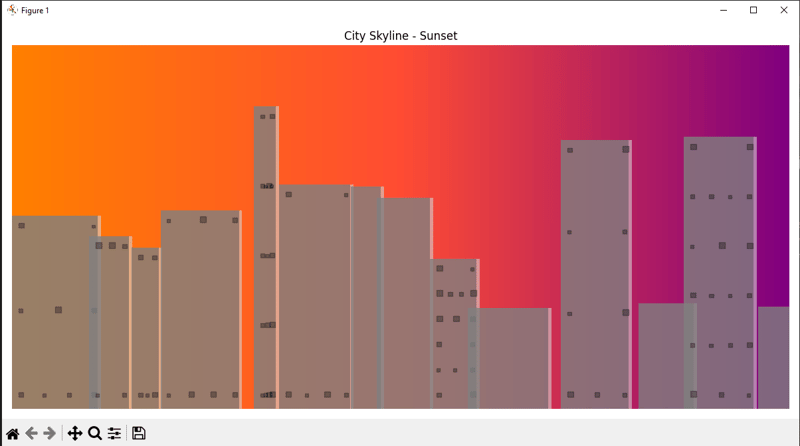
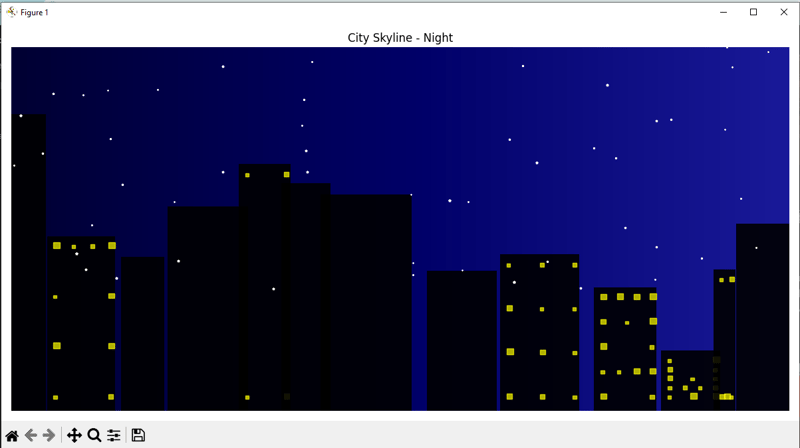
Create a Python program that generates a random city skyline. Buildings should vary in height, width, and window designs. The background must smoothly transition between day, sunset, and night, showing stars at night. Buildings should display glowing windows at night and shading details during daytime, forming an attractive, dynamic cityscape.
Grok 3 Response:
import numpy as np
import matplotlib.pyplot as plt
from matplotlib.colors import LinearSegmentedColormap
import random

def generate_building(x_start, max_height):
 """Generate a single building with random parameters"""
 width = random.uniform(0.2, 1.5)
 height = random.uniform(0.5, max_height)
 windows = random.choice([True, False])

 # Building coordinates
 x = [x_start, x_start + width, x_start + width, x_start]
 y = [0, 0, height, height]

 return x, y, windows, width

def create_skyline(time_of_day='day'):
 """Create a complete city skyline"""
 # Set up the figure
 fig, ax = plt.subplots(figsize=(12, 6))

 # Generate gradient sky
 times = {
 'day': ([0, 0.5, 1], [(0.6, 0.8, 1), (0.4, 0.7, 1), (0.2, 0.5, 0.8)]),
 'sunset': ([0, 0.5, 1], [(1, 0.5, 0), (1, 0.3, 0.2), (0.5, 0, 0.5)]),
 'night': ([0, 0.5, 1], [(0, 0, 0.2), (0, 0, 0.4), (0.1, 0.1, 0.6)])
 }

 positions, colors = times[time_of_day]
 cmap = LinearSegmentedColormap.from_list('sky', list(zip(positions, colors)))
 gradient = np.linspace(0, 1, 256)
 gradient = np.vstack((gradient, gradient))

 # Plot sky
 ax.imshow(gradient, aspect='auto', cmap=cmap, extent=[0, 12, 0, 6])

 # Generate buildings
 x_pos = 0
 buildings = []

 while x_pos < 12:
 x, y, windows, width = generate_building(x_pos, 5)
 buildings.append((x, y, windows))
 x_pos += width * random.uniform(0.8, 1.2) # Add some spacing

 # Plot buildings based on time of day
 for x, y, windows in buildings:
 if time_of_day == 'night':
 # Night: silhouette with glowing windows
 ax.fill(x, y, 'k', alpha=0.9)
 if windows:
 for wy in np.linspace(0.2, y[2]-0.2, random.randint(2, 6)):
 for wx in np.linspace(x[0]+0.1, x[1]-0.1, random.randint(2, 4)):
 size = random.uniform(0.05, 0.1)
 ax.add_patch(plt.Rectangle((wx, wy), size, size,
 color='yellow', alpha=0.7))
 else:
 # Day/Sunset: buildings with shading
 ax.fill(x, y, 'gray', alpha=0.8)
 # Add subtle depth with lighter side
 ax.fill([x[2], x[2]+0.05, x[2]+0.05, x[2]],
 [y[0], y[0], y[2], y[2]],
 'lightgray', alpha=0.6)
 if windows:
 for wy in np.linspace(0.2, y[2]-0.2, random.randint(2, 6)):
 for wx in np.linspace(x[0]+0.1, x[1]-0.1, random.randint(2, 4)):
 size = random.uniform(0.05, 0.1)
 ax.add_patch(plt.Rectangle((wx, wy), size, size,
 color='black', alpha=0.3))

 # Add stars for night
 if time_of_day == 'night':
 for _ in range(50):
 star_x = random.uniform(0, 12)
 star_y = random.uniform(2, 6)
 ax.plot(star_x, star_y, 'w*', markersize=random.uniform(1, 3))

 # Set up the plot
 ax.set_xlim(0, 12)
 ax.set_ylim(0, 6)
 ax.axis('off')
 plt.title(f"City Skyline - {time_of_day.capitalize()}")
 plt.tight_layout()

 return fig, ax

# Generate and display skylines for different times
for time in ['day', 'sunset', 'night']:
 fig, ax = create_skyline(time)
 plt.show()
Here are the outputs of the program:
Chatgpt 4.5 Response:
import pygame
import random
import sys
from datetime import datetime

# Initialize pygame
pygame.init()

# Screen settings
SCREEN_WIDTH, SCREEN_HEIGHT = 1200, 600
screen = pygame.display.set_mode((SCREEN_WIDTH, SCREEN_HEIGHT))
pygame.display.set_caption("Random City Skyline")

# Define color gradients for different times of day
def get_sky_color(hour):
 if 6 <= hour <= 18: # Day
 return [(135, 206, 235), (255, 255, 255)] # Sky blue to white
 elif 18 < hour <= 20: # Sunset
 return [(255, 94, 77), (255, 195, 113)] # Red-orange gradient
 else: # Night
 return [(10, 10, 50), (0, 0, 20)] # Dark blue gradient

# Draw gradient sky
def draw_gradient(surf, colors):
 rect = pygame.Surface((SCREEN_WIDTH, SCREEN_HEIGHT))
 for y in range(SCREEN_HEIGHT):
 color = [colors[0][i] + (colors[1][i] - colors[0][i]) * y // SCREEN_HEIGHT for i in range(3)]
 pygame.draw.line(rect, color, (0, y), (SCREEN_WIDTH, y))
 surf.blit(rect, (0,0))

# Draw stars at night
def draw_stars(surf, count=100):
 for _ in range(count):
 x = random.randint(0, SCREEN_WIDTH)
 y = random.randint(0, SCREEN_HEIGHT//2)
 pygame.draw.circle(surf, (255, 255, 255), (x, y), 1)

# Generate random buildings
def generate_buildings():
 buildings = []
 x = 0
 while x < SCREEN_WIDTH:
 width = random.randint(50, 120)
 height = random.randint(SCREEN_HEIGHT//4, SCREEN_HEIGHT - 50)
 buildings.append(pygame.Rect(x, SCREEN_HEIGHT - height, width, height))
 x += width
 return buildings

# Draw buildings
def draw_buildings(surf, buildings, hour):
 is_night = hour < 6 or hour > 20
 for bld in buildings:
 shade = random.randint(30, 60) if not is_night else 0
 color = (shade, shade, shade)
 pygame.draw.rect(surf, color, bld)

 # Draw windows
 if is_night:
 for y in range(bld.top + 10, bld.bottom - 10, 20):
 for x in range(bld.left + 5, bld.right - 5, 15):
 if random.choice([True, False]):
 pygame.draw.rect(surf, (255, 255, random.randint(150, 220)), (x, y, 5, 8))

# Main loop
def main():
 clock = pygame.time.Clock()

 # Get current hour for sky condition (or choose manually)
 hour = datetime.now().hour

 buildings = generate_buildings()

 running = True
 while running:
 for event in pygame.event.get():
 if event.type == pygame.QUIT:
 running = False

 sky_colors = get_sky_color(hour)
 draw_gradient(screen, sky_colors)

 # Draw stars only at night
 if hour < 6 or hour > 20:
 draw_stars(screen, 150)

 draw_buildings(screen, buildings, hour)

 pygame.display.flip()
 clock.tick(30)

 pygame.quit()
 sys.exit()

if __name__ == "__main__":
 main()
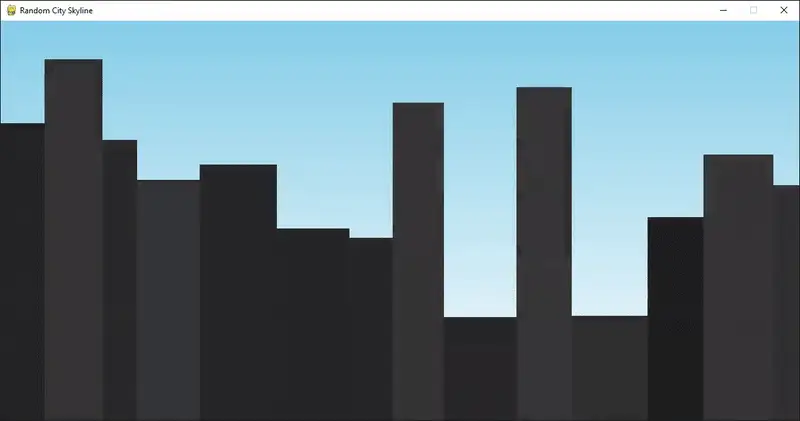
Here's the output of the program:
Summary
Grok 3 performed well, generating three distinct skylines exactly as expected. Each scene transitioned smoothly between day, sunset, and night. ChatGPT-4.5, however, was disappointing. Its output felt randomly animated and inconsistent, failing to deliver the expected transitions clearly. I honestly don't know what went wrong with 4.5, but Grok 3 definitely delivered this time.
Final verdict
After testing both Grok 3 and ChatGPT-4.5 the results were clear. Grok 3 performed consistently well. It handled realistic physics simulations, interactive visuals, and modern user interfaces smoothly. It felt reliable and delivered exactly what I wanted.
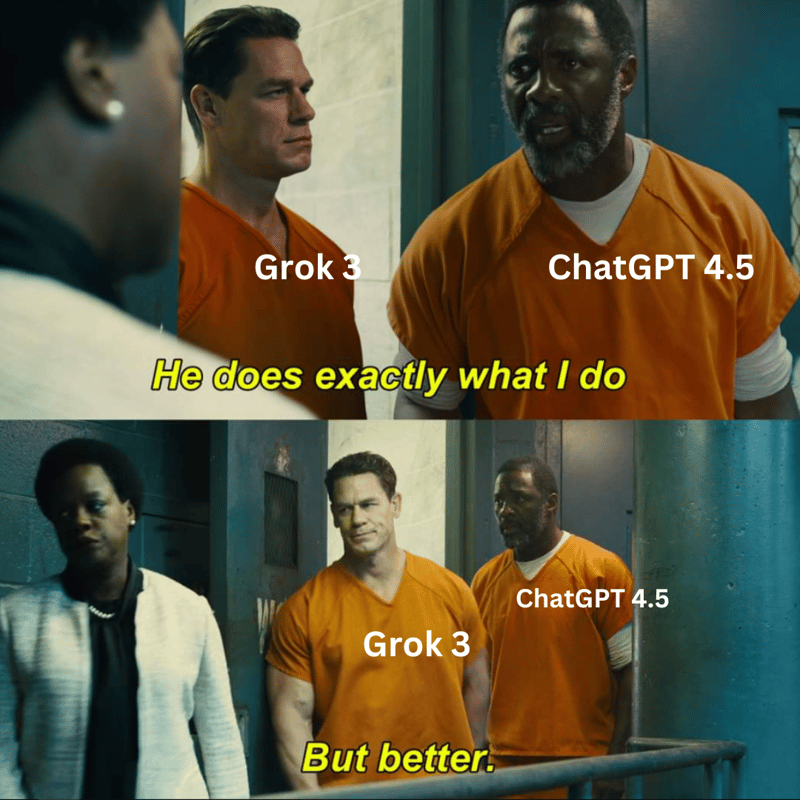
ChatGPT-4.5 was disappointing. It struggled with practical tasks and often gave me blank screens and random animations. Given its benchmarks I expected much better results.
Right now Grok 3 is clearly the better choice for real-world tasks. ChatGPT-4.5 is still in beta so hopefully it improves soon. Until then Grok 3 is the more reliable option.
