ПІДТРИМАЙ УКРАЇНУ
ПІДТРИМАТИ АРМІЮ
Azure DevOps: Version Control Using Git and VS Code
In this exercise, we will be learning the foundations of version control using Git on Azure...
In this exercise, we will be learning the foundations of version control using Git on Azure DevOps platform. This article is based on the steps outlined by Microsoft Azure DevOps labs here
What is Git?
Git is adistributed version control system (DVCS)that helps developers track changes in their code, collaborate efficiently, and manage project history. It enables teams to work on the same project simultaneously, merge changes, and revert to previous versions when needed.
Key Features of Git:
- Distributed System– Every developer has a complete copy of the repository, allowing offline work.
- Branching & Merging– Developers can create separate branches (versions of the source code) for features and merge them to the main version later.
- Version History– Keeps track of all changes, making it easy to roll back to previous versions.
- Collaboration– Teams can work together using remote repositories like GitHub, GitLab, or Azure DevOps.
Key Concepts
Git Repository:
AGit repository (repo)is a storage space for your project's code, including its entire history of changes. Repositories can be:
- Local– Stored on your computer.
- Remote– Hosted on platforms likeAzure DevOps, GitHub, or GitLabfor team collaboration.
Branching in Git
Each branch in Git can have both alocalandremoteversion.
To share changes:
1. Commit Locally– First, commit the changes on your local machine (on the local branch).
2. Push to Remote– Push the committed changes to the remote version of that branch.
3. Merge to Main– Once the changes are tested and ready, they can be merged from the remote branch into the main branch.
CI/CD (Continuous Integration/Continuous Deployment):
CI/CDis a software development practice that automates testing, building, and deploying code. It helps ensure fast and reliable software delivery and updates by:
- Continuous Integration (CI):Automatically testing and merging code changes.
- Continuous Deployment (CD):Automatically deploying code to production after passing tests.
Git on Azure DevOps
Azure DevOps is a cloud-based platform that providesGit repositories, CI/CD pipelines, and project management tools. It allows teams to store, manage, and collaborate on code efficiently.
Let's get started!
What we need:
- Visual Studio Code with the C# extension installed
- Git installed and configured on your machine. For Windows , For Mac
- Azure subscription and Azure DevOps account: An Azure subscription is required in addition to an Azure Dev Ops account. If you don't have those yet, follow the steps here
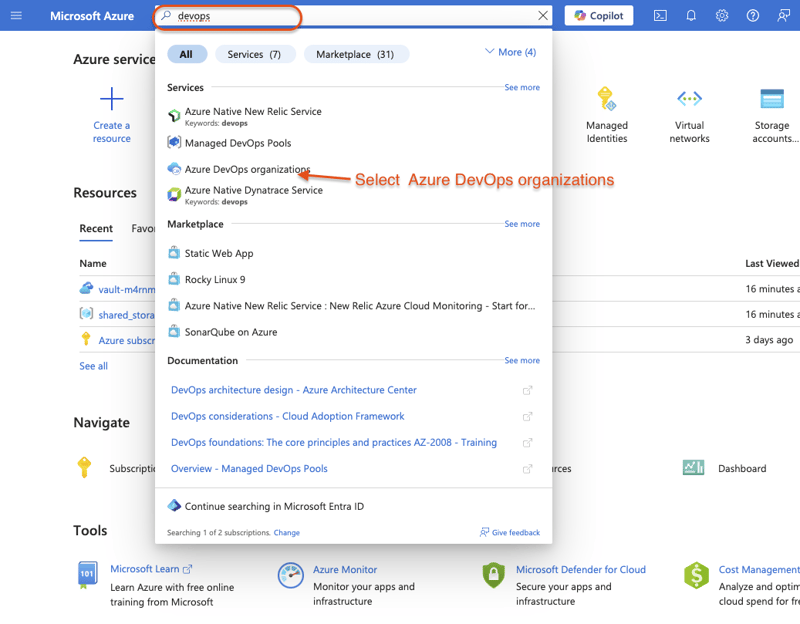
Create Azure Dev Ops Organization:
-
In your Azure portal, search for and select Azure Dev Ops Organizations
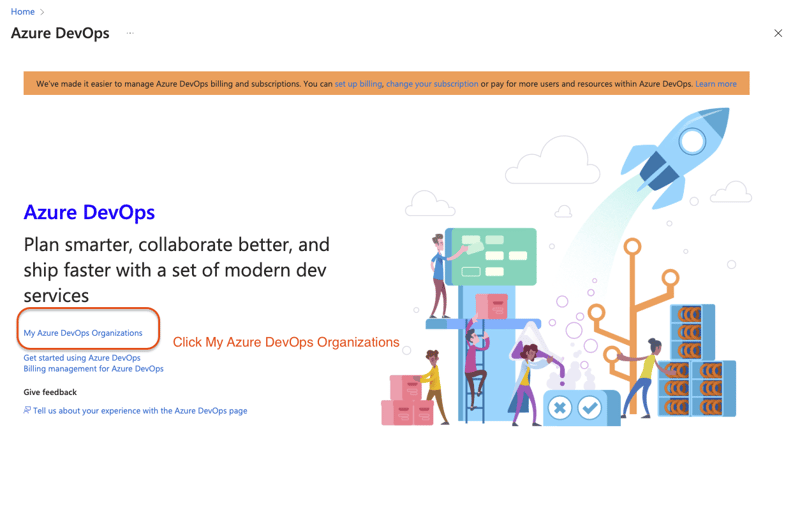
-
Click My Azure DevOps Organizations
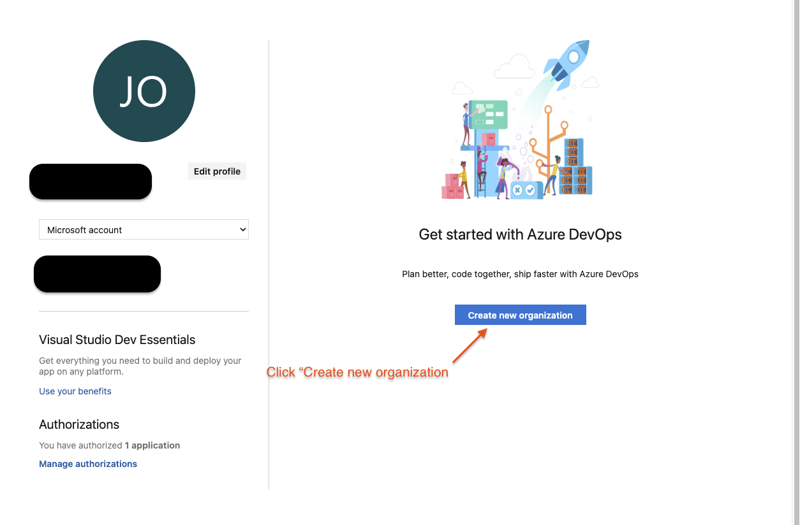
-
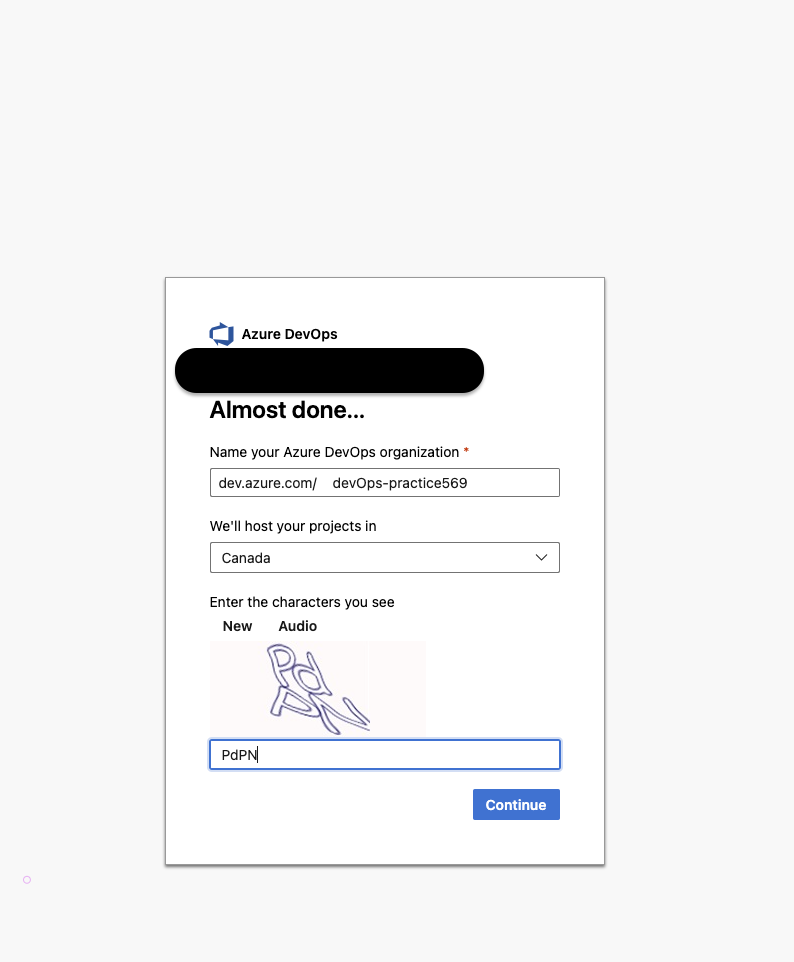
Click "create new organization"
-
Click continue, name your organization (must be globally unique), select region to host, and enter the security characters
-
Click continue again. Your organization will now be created
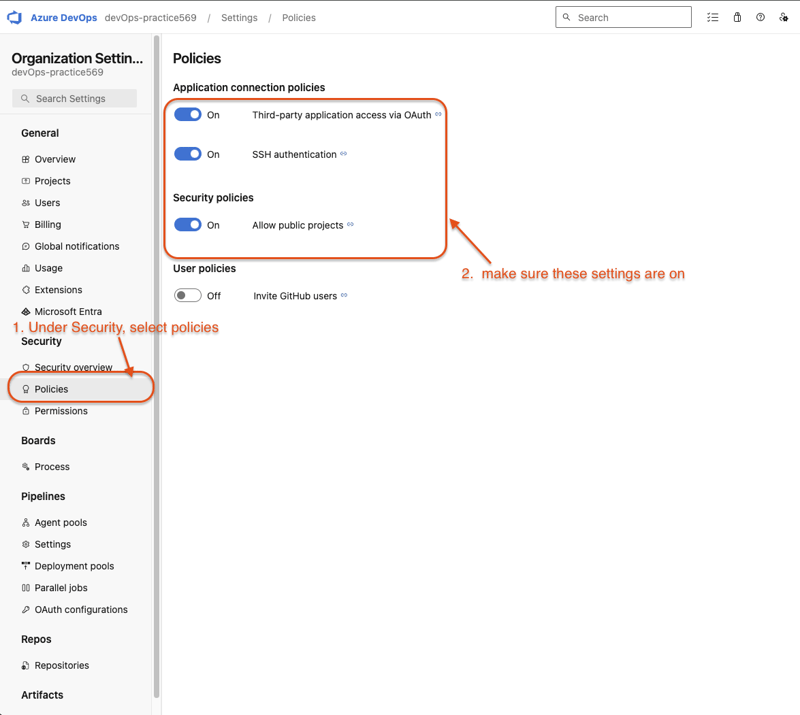
Enable the creation of classic build and release pipeline
Since this organization is new, we need to enable the creation of classic build and release pipelines
-
In the Azure DevOps portal, select your newly created organization
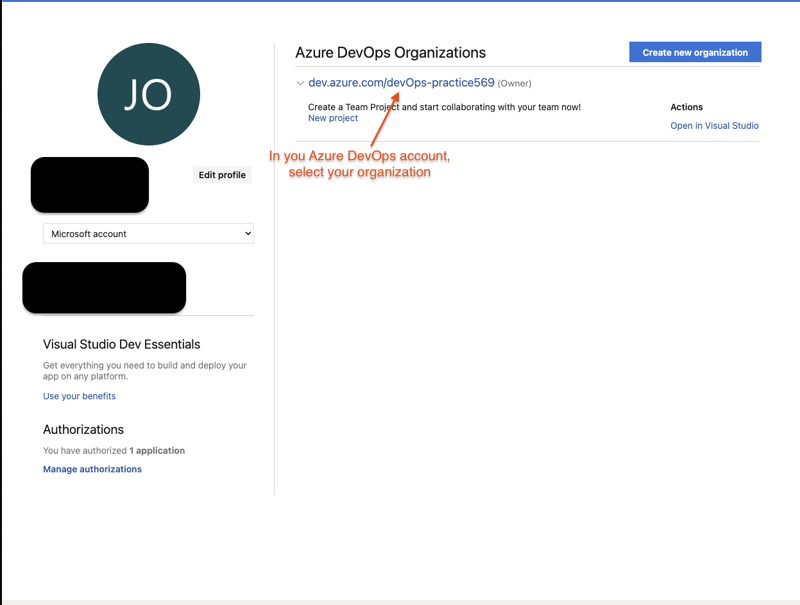
-
Select Organization Settings
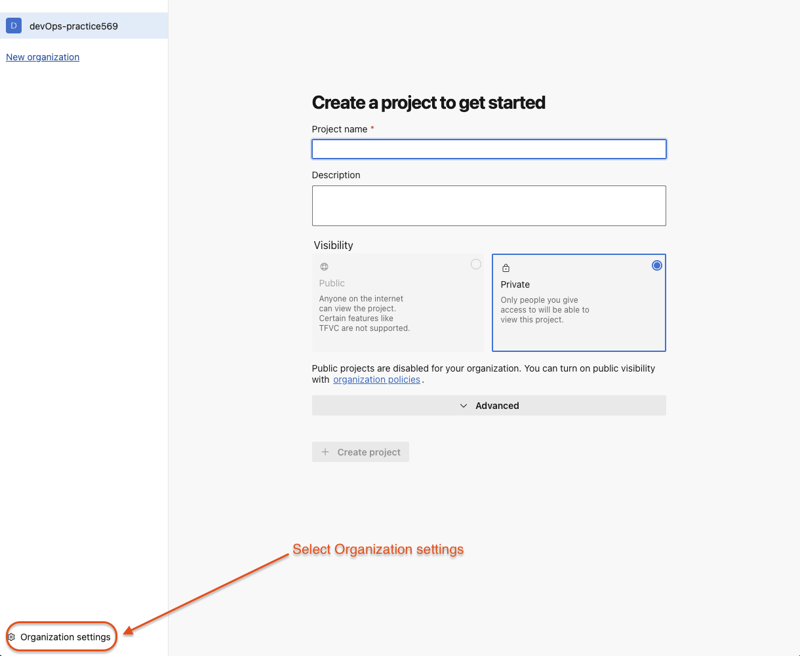
-
Under Pipelines, select Settings
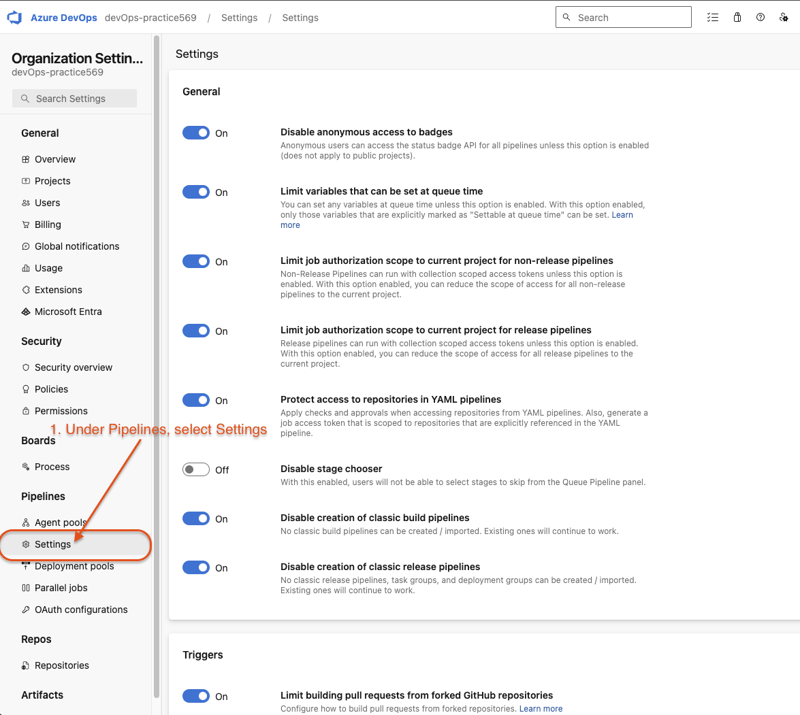
-
Make sure these settings are disabled:
- Disable creation of classic build pipelines
- Disable creation of classic release pipelines

Configuring the Parts Unlimited team project
Now we need to configure the Parts Unlimited team project. This is needed for certain Azure DevOps labs. In this case, we will use it as a sample codebase to practice Git operations on, simulating real use of the Azure DevOps platform and Git commands.
Go to https://azuredevopsdemogenerator.azurewebsites.net
This site will automate the process of creating a new Azure DevOps project within your account that is prepopulated with content (work items, repos, etc.) required for the lab.
-
Click Sign in and enter your Azure Dev Ops account information
-
Read and Accept the permissions
-
Click choose template and select Parts Unlimited
-
Type parts Unlimited as the Project Name
-
Select the organization previously created and click create project
-
Click "Navigate to project"
-
If you're redirected to 404 page, saying project doesn't exist, follow these steps in organization settings:
-
Once these settings are changed, create the project again following the previous steps
Configuring Git Credential Helper in Visual Studio Code
In this task, we will configure aGit credential helperto securely store the Git credentials used to communicate withAzure DevOps.
Steps:
- Open Visual Studio Code.
- From the main menu, navigate to:Terminal → New Terminal(to open a terminal window). On mac, click terminal in the top status bar.
- Execute the following command to configure a credential helper:
git config --global credential.helper wincred
- Enter these commands to configure your user name and email for Git commits. Replace the parameters with your preferred user name and email and execute them.
 git config --global user.name "Your name"
 git config --global user.email youremail@example.com
Cloning a repository:
What is Cloning?
Cloning a repository means creating a local copy of a remote Git repository on your machine. This allows you to work on the project locally, make changes, and sync with the remote repository when needed.
When you clone a repository, Git downloads all the files, history, and branches, allowing you to contribute or experiment without affecting the original remote repository.
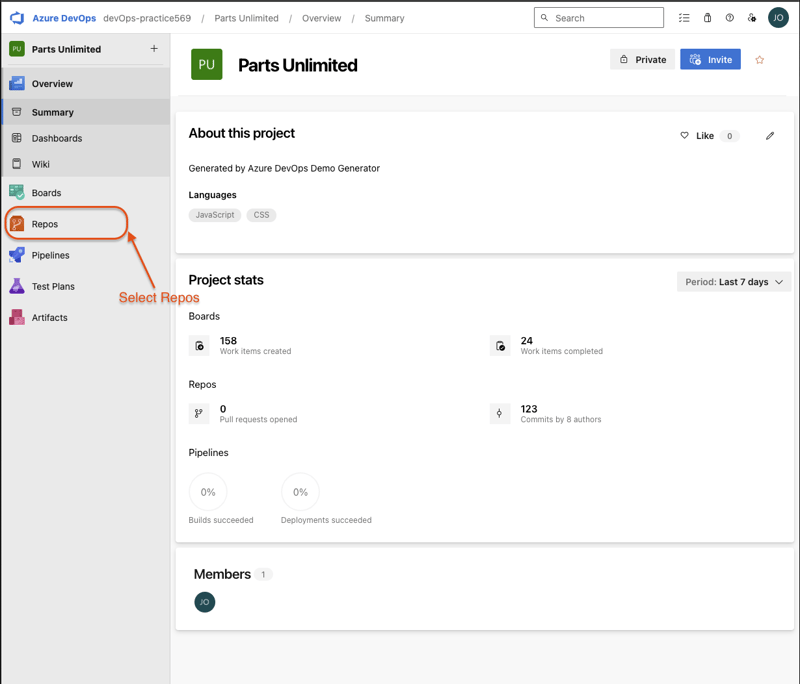
- Open the tab where you navigated to your project
-
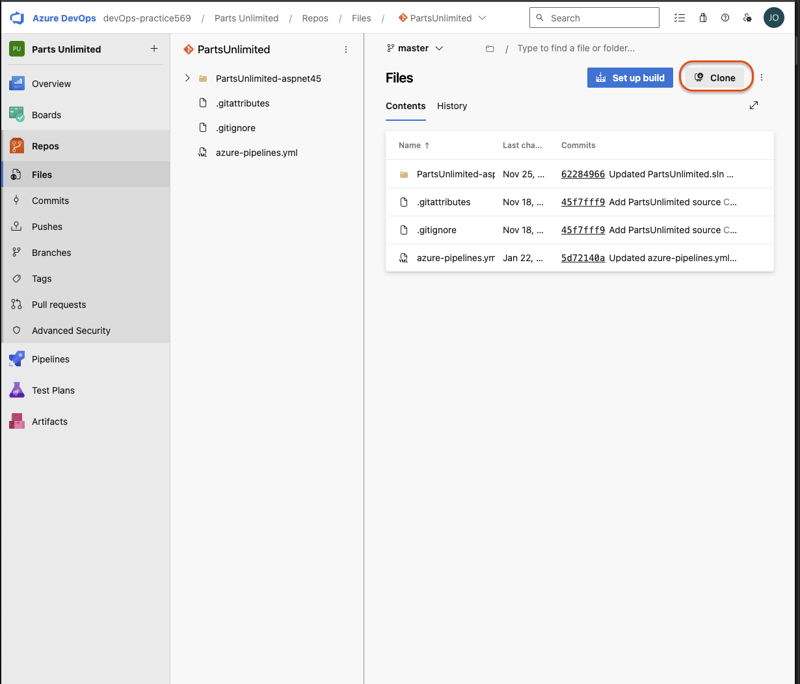
Navigate to Repos hub
-
Click clone
-
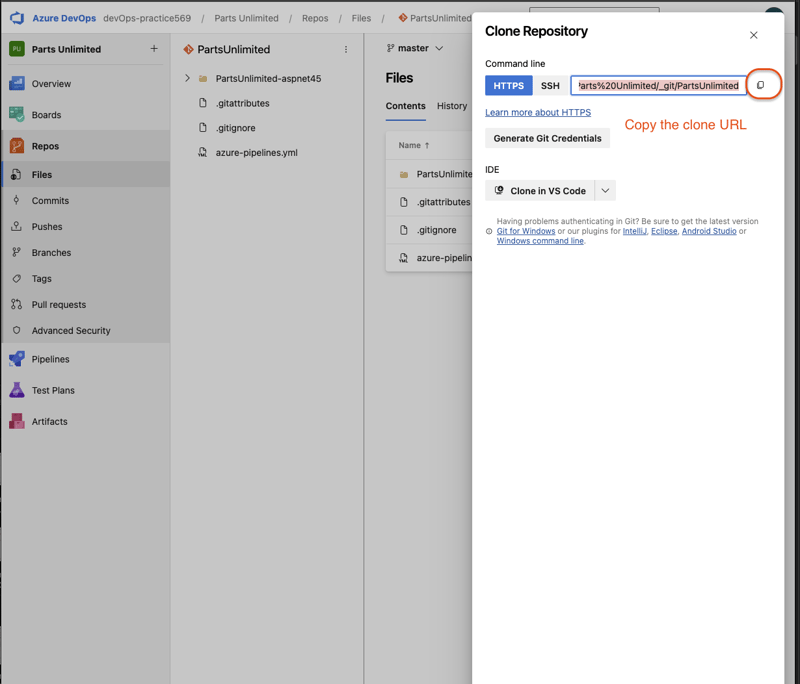
Copy the clone URl
-
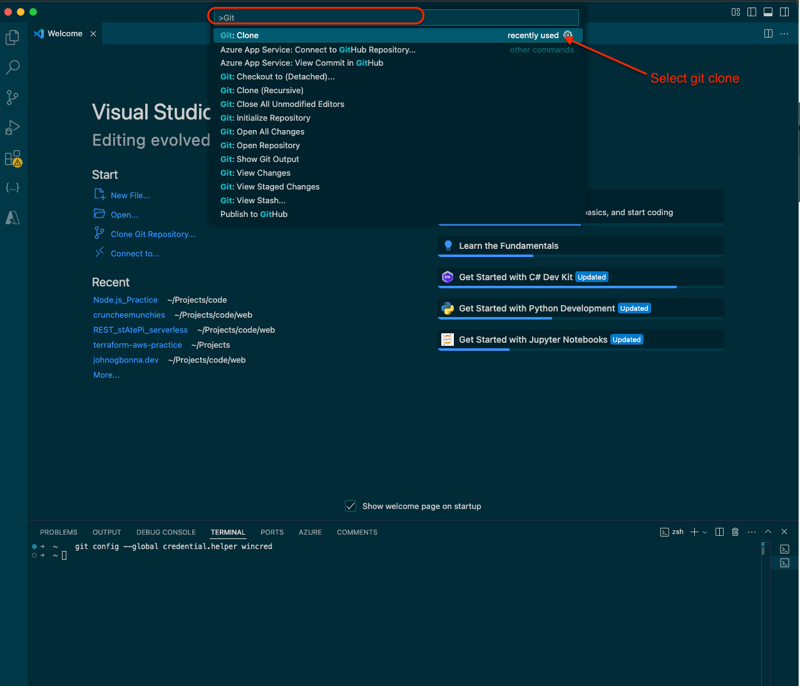
In visual studio code, pressCtrl+Shift+Pon Windows orCMD+Shift+Pto show the command Palete
-
Search for and select Git Clone

-
Paste the project clone URL that you copied
Paste the project clone URL that you copied -
Go back to your browser where you have the repository open. Click "Generate Git credentials"
-
Store the user name and password. Copy the password
-
Enter the password when prompted in the command pallete
-
You will have to specify or create a destination folder for the project to be cloned into
-
Open repository
Saving your work with commits
-
On Vs code, with the repository open, select command + p (mac) or control + p (windows) to search for files. Search for and select Cartitems.cs
-
Create a comment and write anything. This can be done by entering '//' before your comment message. We are simulating a change in the code here. Save the file (command / control + s).
-
Commiting your code saves the state of changes to your local machine on your local branch.
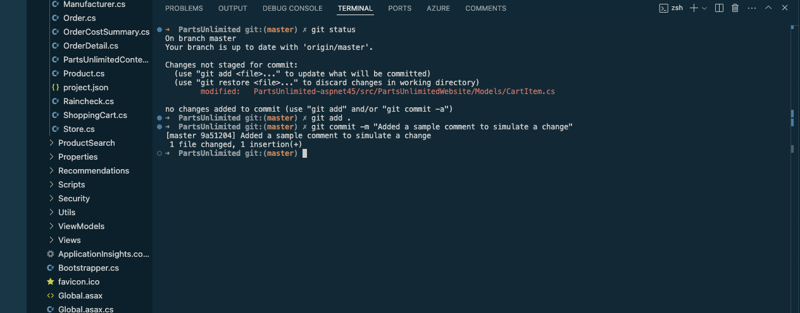
Run the following commands in the terminal:
git status
Explanation:
git status
- This command shows the current state of your working directory and staging area.
- It tells you which files have been modified, staged, or remain untracked.
git add .
git commit -m "Added a sample comment to simulate a change"
Explanation:
git add .
This command stages all the changes in your working directory, preparing them for commit.
git commit -m "Your message"
This command saves the changes with a commit message, allowing you to track what was modified.
The commands should have a result like this:
Pushing your local commits to the remote branch
Once your changes are committed locally, you need topushthem to the remote repository so that others can access them.
- First, verify the remote repository linked to your project by running:
git remote -v
You should see something like:
origin https://github.com/your-username/your-repository.git (fetch)
origin https://github.com/your-username/your-repository.git (push)
- Run the following command to push your local commits to the remote branch:
git push
-
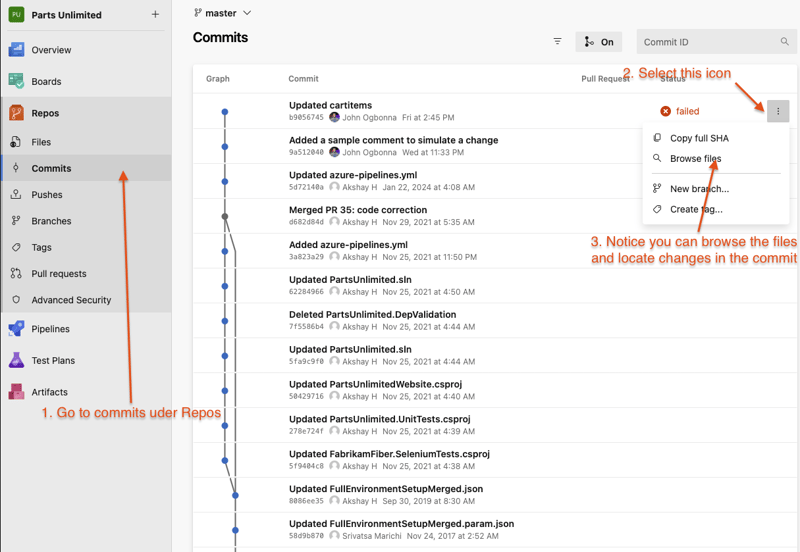
Check the repo in Azure you Azure DevOps account. Under Repos > Commits, you should see the latest push.
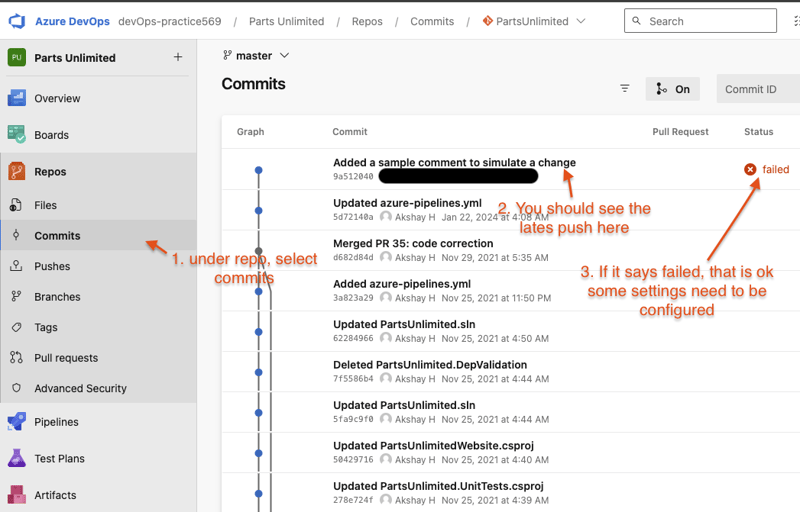
-
If you see a failure message like in the picture above, you may need to fill out the form here
Staging changes
Staging specific changes allows you to choose what and what not to commit. In the last example, we commited all changes by using the command git add .
We will now modify two different files but we will only commit and push the changes in one of these two files,
-
In VS code, open the
CartItems.csfile again. Add another comment like so, Save the file: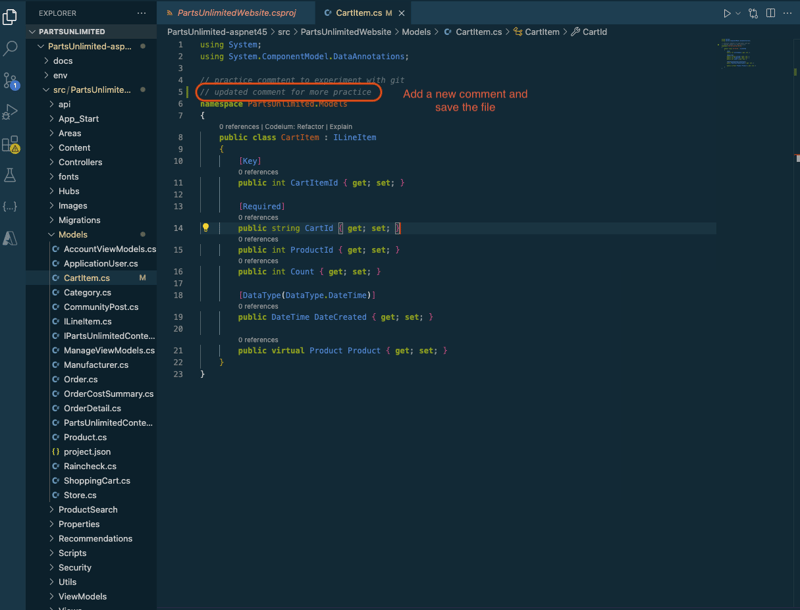
-
Press
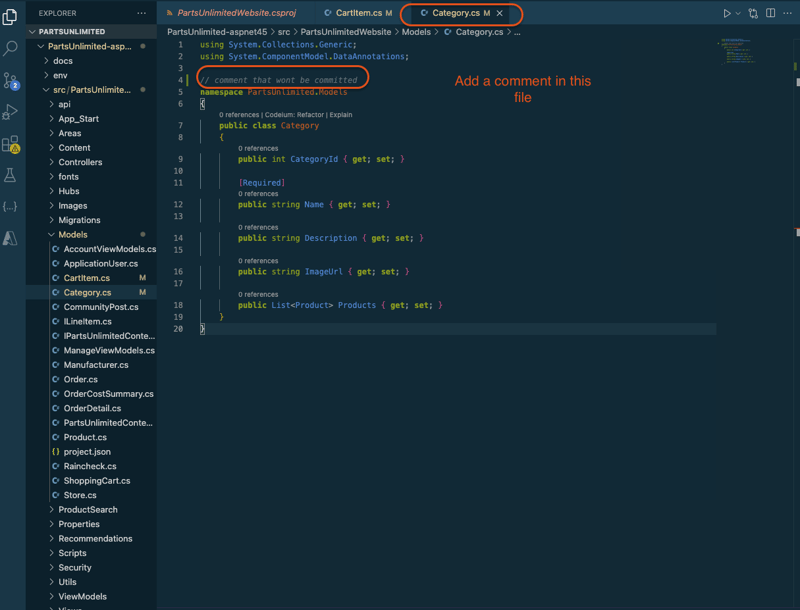
command + porcontrol + p(Mac and Windows Respectively) and search for and select theCategory.csfile -
Make a new comment. Ex: 'comment that wont be committed', Save the file
-
In the terminal, enter:
git status
-
you should see that no changes are currently staged

-
Then enter:
git add PartsUnlimited-aspnet45/src/PartsUnlimitedWebsite/Models/CartItem.cs
- This will add the changes in
CartItem.cs - Next, enter:
git commit -m "updated cartitems"
-
This will commit the changes from only
CartItem.csto your local branch -
Finally, enter:
git push
-
This will push the changes to the remote branch. Only
CartItems.cswill be updated remotely. -
In the Azure DevOps portal, navigate to Repos > commits and you will see the latest commit
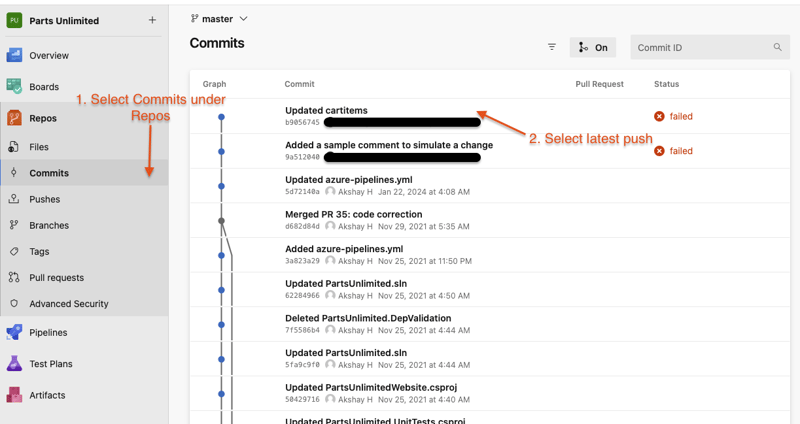
-
You will notice that only the CartItems.cs was updated
Comparing files
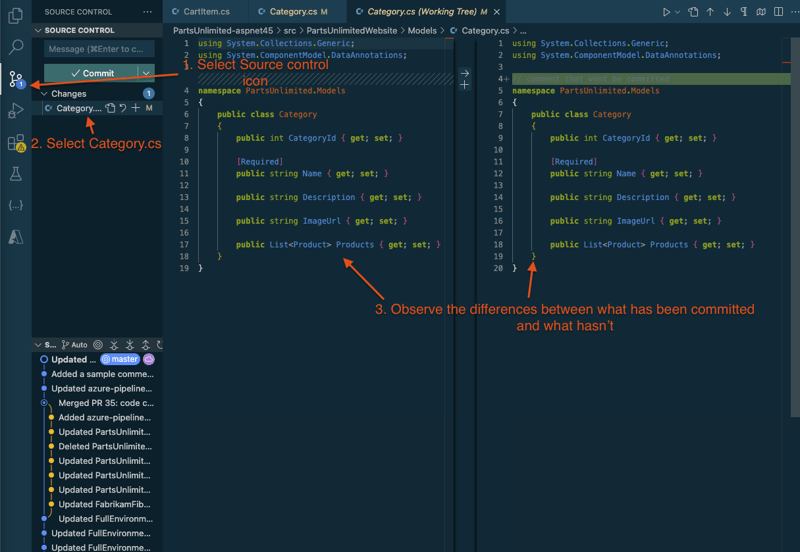
- In VS code, select Source Control on the left hand side and select Category.cs
-
A comparison view will be opened to enable you to easily locate the changes you’ve made. In this case, it’s just the one comment.
-
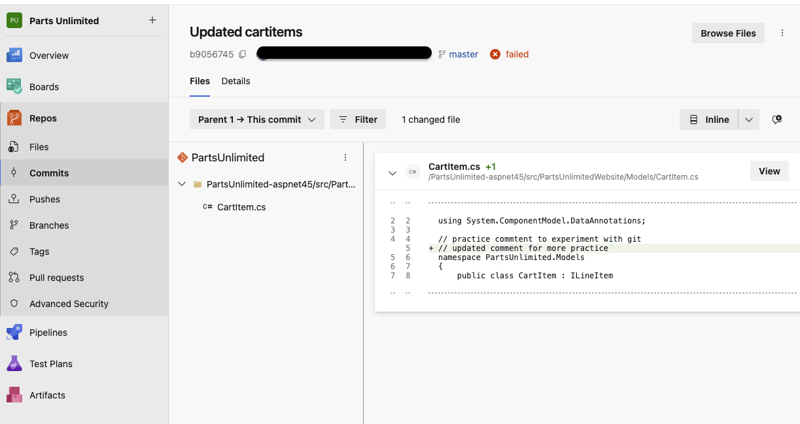
In Azure DevOps portal, in the commits view, you can see the latest commit. By clicking the 3 dot menu, you can select browse files to see the changes in each commit
Working with branches
Branches allow you to develop features, fix bugs, or experiment without affecting the main codebase. These changes can then be merged into the main codebase when properly tested
Viewing Existing Branches
To see all branches in your repository, run:
git branch -a
Currently, we you be on a master branch. Press q to exit branches view
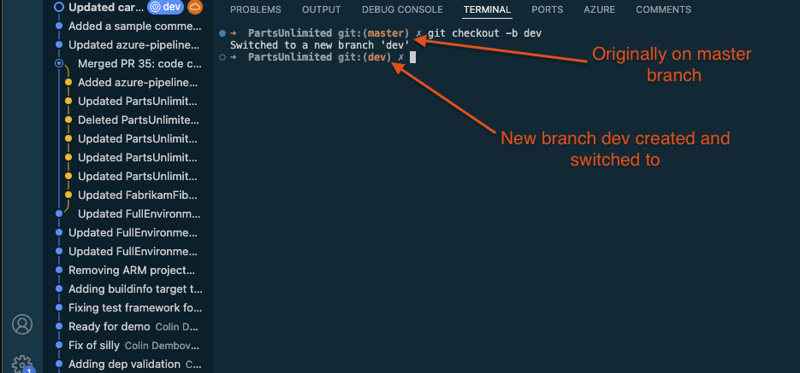
- In the terminal, enter:
git checkout -b dev
This will create a new branch called dev The current branch (master) will be used as the starting point for this new branch. In the terminal, you will see that you are now on the dev branch
- Right now, we have created a local branch called
dev. There is no corresponding remote version of thedevbranch. To publish a remote version of this branch in Azure DevOps, enter:
git push --set-upstream origin dev
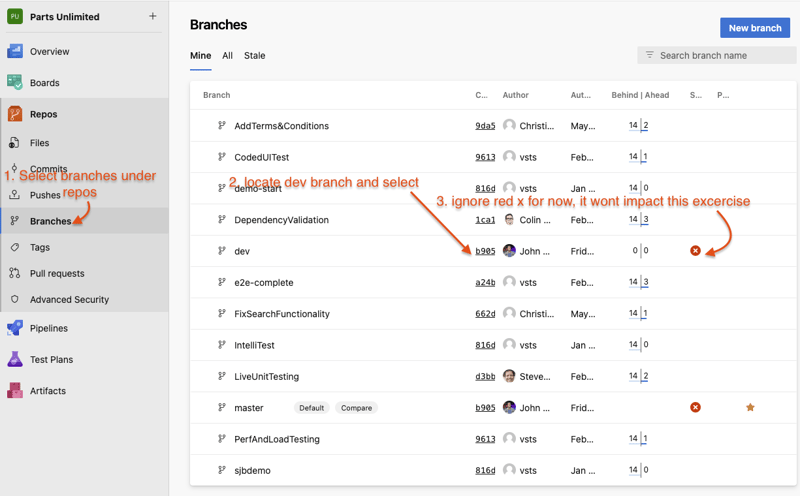
- From the Azure DevOps browser tab, select Branches. Locate your new dev branch.
Deleting remote branches
-
In the branches view, hover over the dev branch, select the 3 dot menu, and click delete branch. Confirm the deletion

-
The remote dev branch is now deleted. However, the local one on your machine still exists. To delete it, first go to the terminal
-
Enter this command to switch to the
masterbranch (we cannot delete the dev branch if we are currently on it)
git checkout master
- Now enter this command to delete the
devbranch
git branch -d dev
- Finally, enter this command to update your local environment with proper branch information from the remote repository
git fetch --prune
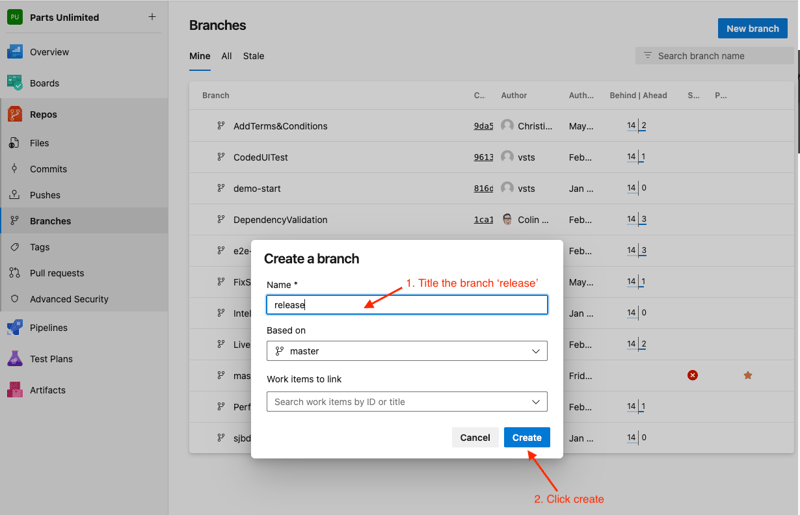
Creating a new branch in the DevOps portal
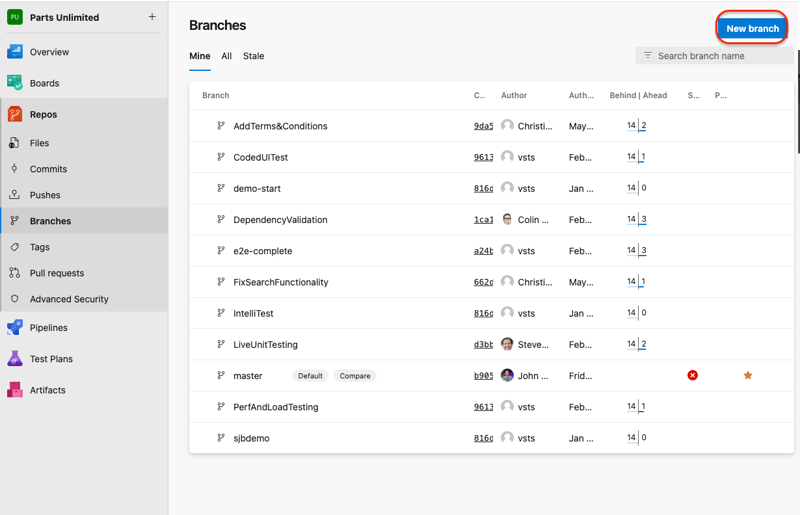
- Under repos, navigate to branches. Select new branch
-
Call this branch release. It will be based on the master branch. Click create
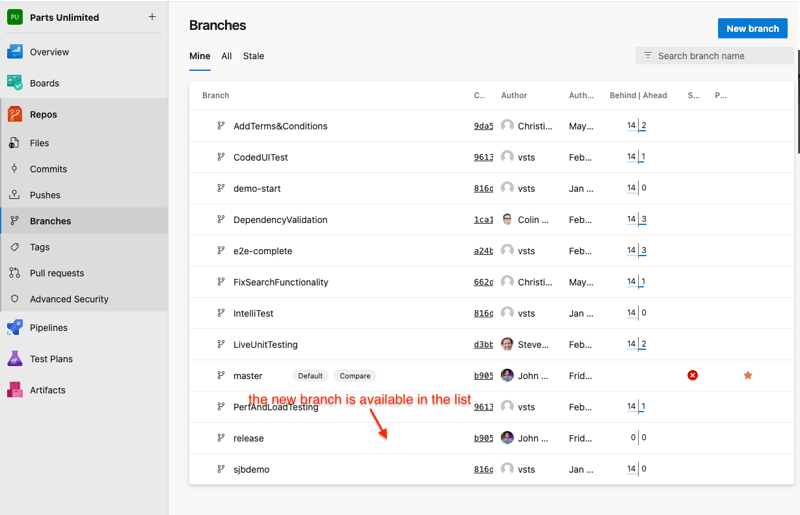
-
The branch should appear in the list
-
You must now update your local git environment with the proper branch information. To do this type this command int he terminal:
git fetch
- Now that the branch information has been synced between the remote branches on Azure DevOps and your local machine, you can checkout the a
releasebranch locally by entering
git checkout release
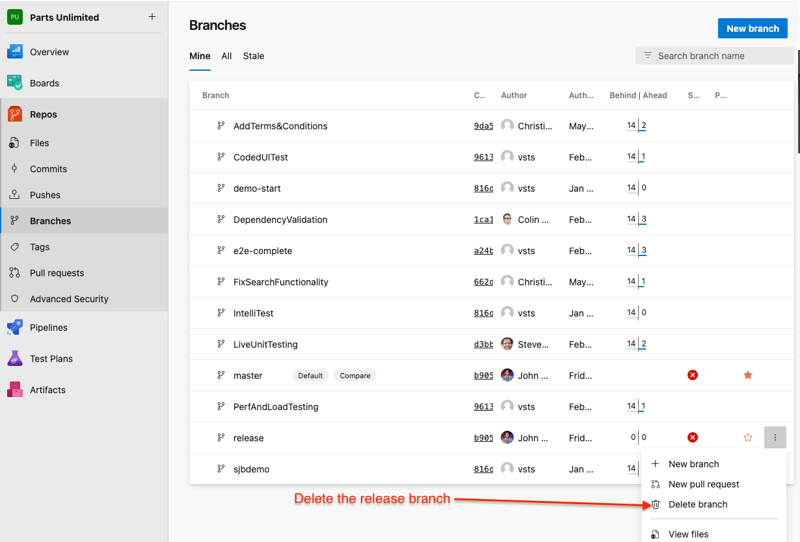
Restoring a remote branch
-
Delete the release branch. Confirm the delete when prompted
-
Type release in the query labeled
search branch name -
Hover over the release branch, over the 3 dots, then select
restore branch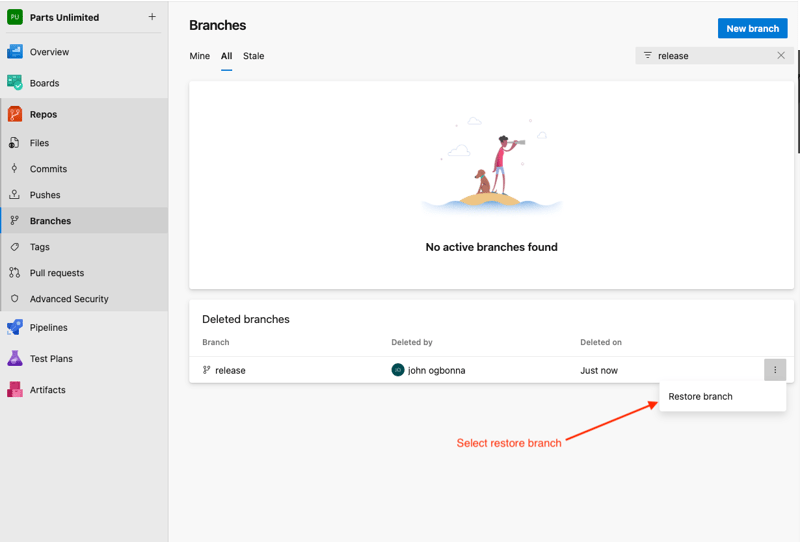
-
The remote branch is now restored
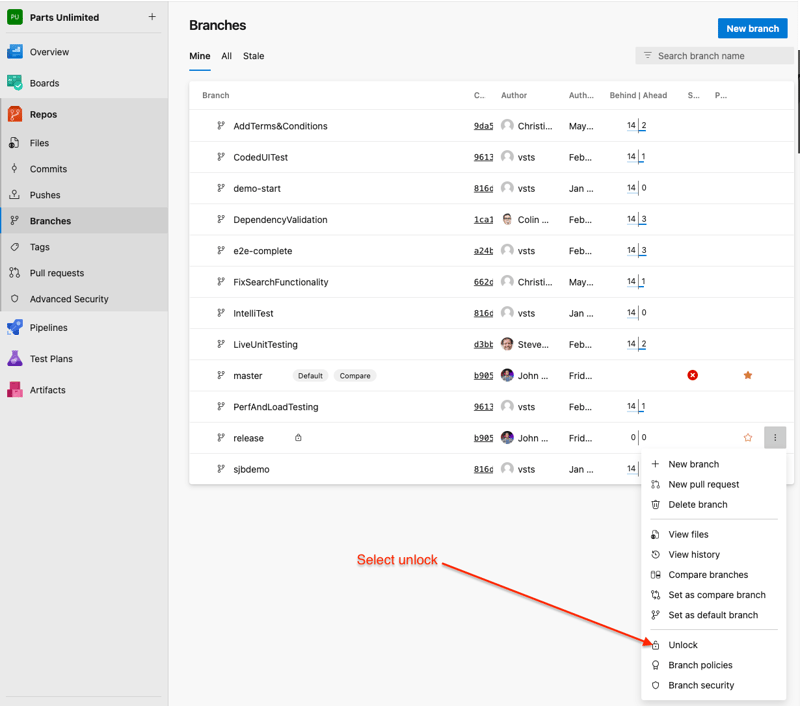
Locking a branch
-
In the Repos > Branches view, hover over the 3 dot menu on the master branch. Select Lock
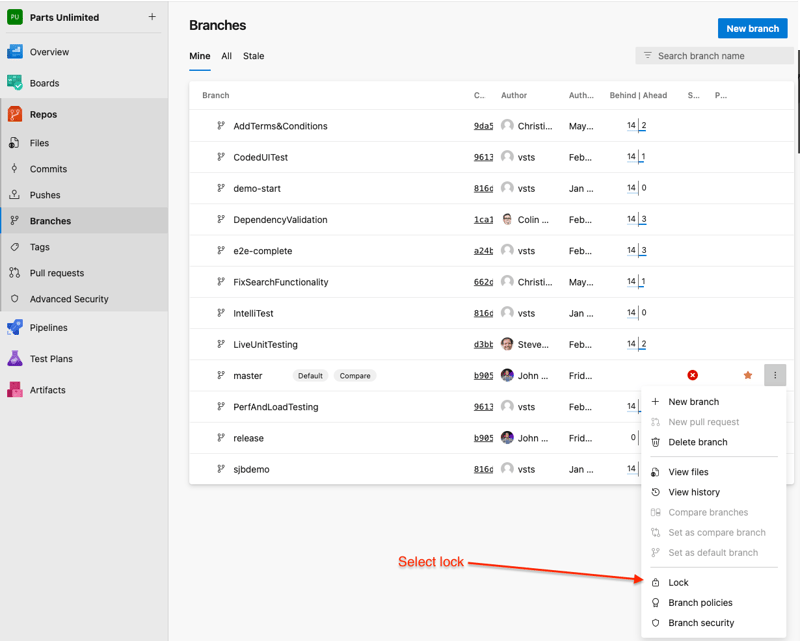
-
Unlock with the same process
Working with releases
What is a release?
Areleasein Git represents a specific version of your project at a given point in time. It is typically used for:
- Markingstable versionsof your code.
- Creatingversioned snapshotsof your repository.
- Distributing software updates to users.
- Keeping track of changes between different versions.
Releases are often associated withtagsin Git, which serve as reference points for specific commits.
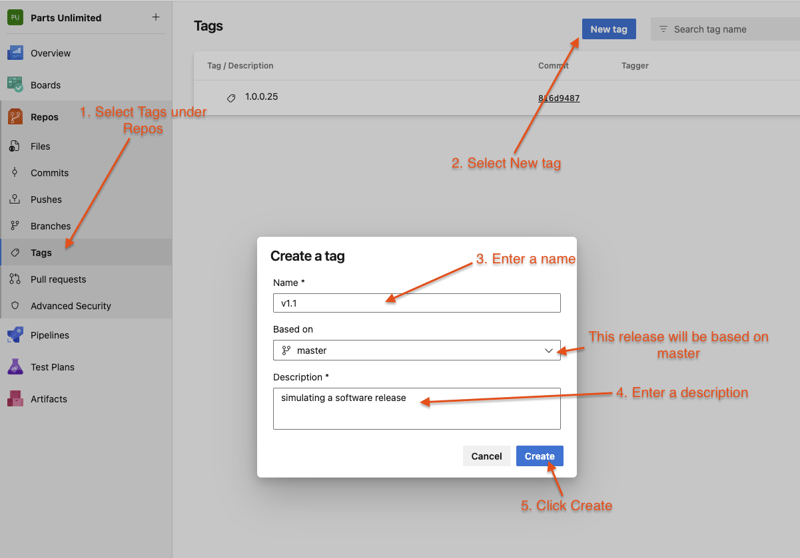
Creating a Tag for a Release
- In your browser, in the Azure DevOps portal for the project, under
Repos, selectTags - Select
New Tag - Enter the a name for the tag, ex v1.1
- The tag can be based on any branch, in this case we will leave it based on master
-
Enter a description, then click create
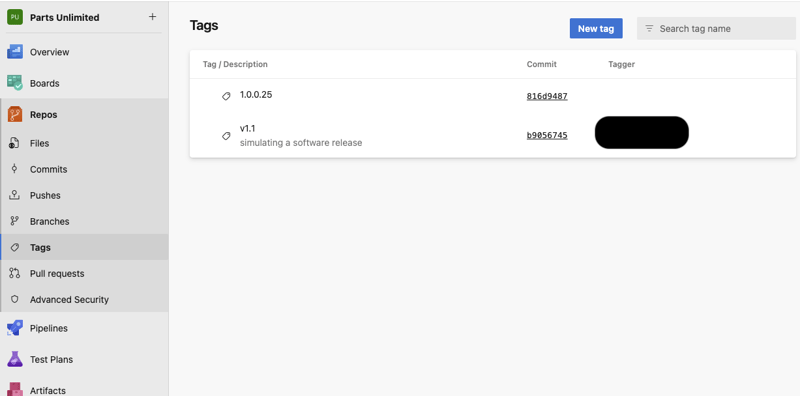
-
You have now tagged the project at this release. You can tag commits for a variety of reasons. Azure DevOps offers the flexibility to edit and delete them, as well as manage their permissions.
Managing Repositories
Creating a Repo
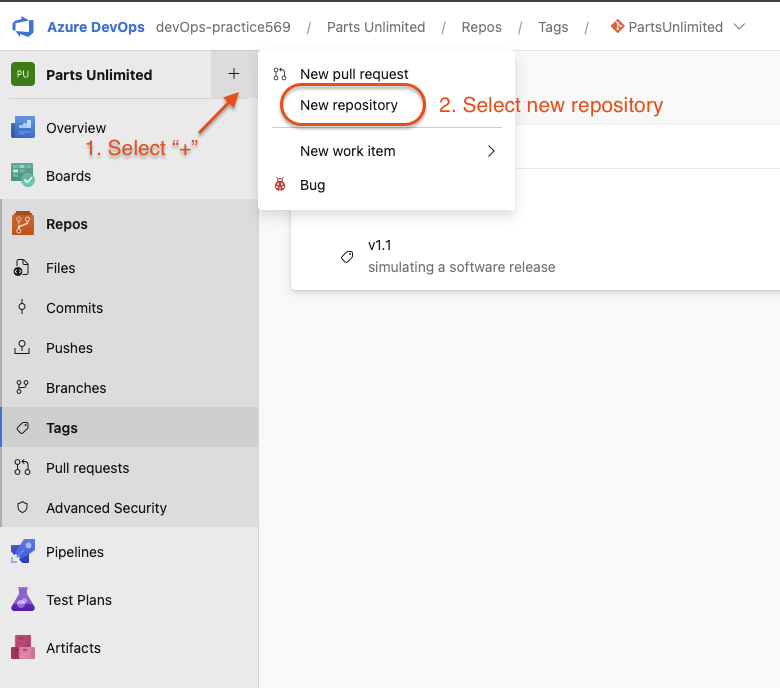
-
From the project Add dropdown, select New repository.
-
Pick a new Repository name. Notice that you also have the option to create a file named
README.md. This would be the default markdown file that is rendered when someone navigates to the repo root in a browser. It usually contains general information about the code base/project. You can also initialize the repo with a.gitignorefile. This file specifies which files, based on naming pattern and/or path, that will not be tracked and added into the Repository. This is useful for secret files that contain private information and need to stay on your local machine. There are several templates available that include the common patterns and paths to ignore based on the project type you are creating. Click Create.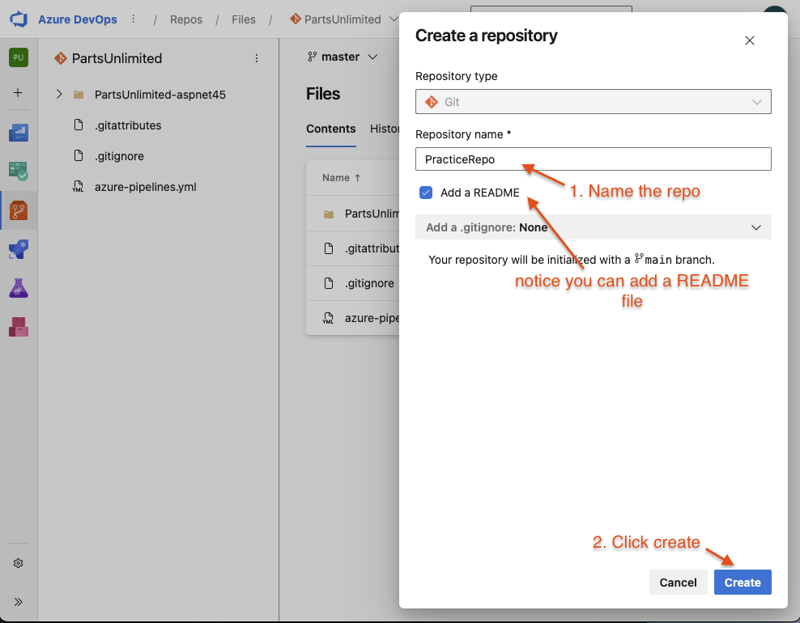
Deleting and renaming Git repos
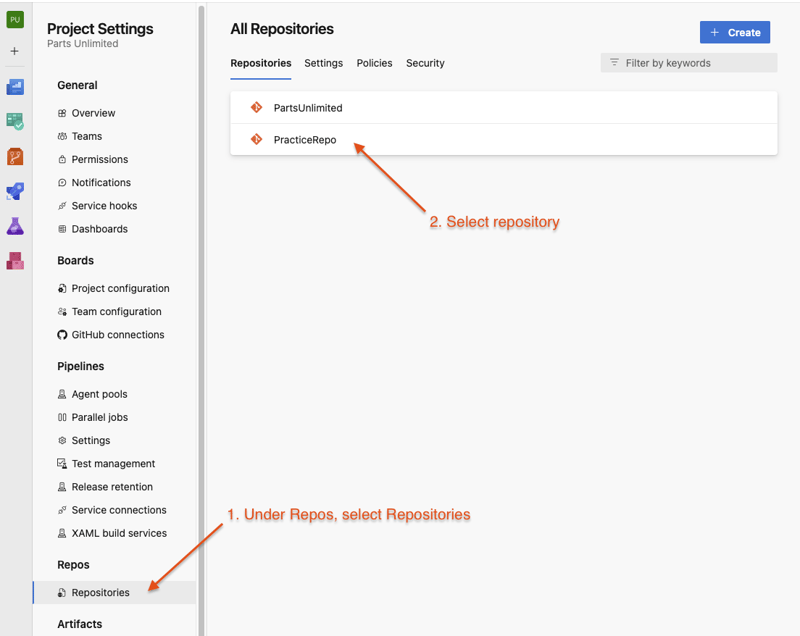
- Select Project settings at the bottom of the page

-
Select the Repository recently made
-
Notice the rename and the delete options

Summary
In this guide, we explored the fundamentals ofGit version controlinVisual Studio CodeandAzure DevOps.
Key Takeaways:
- Git Setup: Configured Git credentials, user identity, and cloned a repository.
- Making Changes: Edited files, added comments, and saved changes using
git commit. - Tracking Changes: Used
git statusto check modifications before committing. - Branching: Created new branches with
git checkout -b, allowing for isolated development. - Pushing Changes: Uploaded local commits to a remote repository using
git push. - Working with Releases: Managed versioning with Git tags for stable releases. _Managing Repositories: We learned how to create, rename, and delete repos. We explored the Repository initialization process in Azure DevOps and the available options
Ресурс : dev.to