Architecting for Security: MySQL Edition

MySQL is a powerful, but complicated database management system - as popular as this RDBMS might be,...
MySQL is a powerful, but complicated database management system - as popular as this RDBMS might be, there are still questions surrounding it - one of the main ones being related to security. In this blog, we will tell you everything you need to know to build a secure foundation for your data using MySQL.
As developers, we already know how important it is to ensure that the systems we build perform at the very best of their ability. However, an often neglected side of application and especially database development is security. How do we build databases that are resilient to the attacks that target our infrastructure? We know you‘re already familiar with basic attack vectors like SQL injection, but in the database world, there‘s so much more to that. Let us walk you through everything you need to know.
Architecting for Security – the Basics
Our databases won’t be safe if our applications are flawed, so to start with, familiarizing yourself with 10 of the most prevalent threats for web applications – the so-called OWASP Top 10 – is a good starting point.
The OWASP Top 10 is a frequent starting point for developers that want to secure their software, and it‘s a good one at that – the OWASP Top 10 provides ten of the most dangerous security flaws targeting our software and databases, and it‘s frequently referred to as the industry-standard practice for securing web applications. Some developers also familiarize themselves with GDPR, ISO 27001, and HIPAA if they‘re working for a company that requires those, but for most, OWASP provides a really good starting point.
Architecting for Security – Attacks and Data
Before we protect our databases, we must ensure that our applications are safe and we can do so if we employ secure coding principles and follow the advice contained in the OWASP Top 10. Doing so is very important because the attacks outlined by OWASP target not only applications but databases as well. Here’s why everything is so interconnected:
-
One of the primary purposes of a data breach is to steal data belonging to a company, then sell it to other attackers for profit. Once data is sold, it‘s frequently used in credential-stuffing attacks to target other systems of the same kind or to mount identity theft attacks towards people who have reused their passwords.
-
The more entries a database has, the more interesting it is to an attacker – a database with 300,000,000 rows will certainly yield more „revenue“ when it‘s sold compared to its counterpart with 15,000 records – identity theft attacks are lucrative, after all.
-
The price of a database is also dependent on the data classes in it – a database containing plain text passwords and SSNs would yield more benefit for the attacker than simply stealing usernames and hashed passwords (hashed passwords often require substantial work to revert them back to a plaintext format.)
You get the point – life after a data breach isn‘t exactly the sweetest one. There are some good news, though – most attacks threatening web applications can be easily fended off by following basic security advice: ensure that your application is not passing user input straight into a database without verification, cleanse it where you make user input visible to the user to protect your web application from Cross-Site Scripting , use PDO when interacting with your databases to fend off SQL injection attacks, and consider using a CDN like the one provided by CloudFlare to protect your web applications from DDoS attacks.
All that is a good starting point – securing database management systems, however, is a different beast altogether. Read on to understand why.
Architecting for Security – Securing MySQL
As far as MySQL security is concerned, there are multiple things we should keep in mind. The things that we should familiarize ourselves with include, but are not limited to:
-
The security of user accounts, password security, and access control.
-
The “intensity” of privileges that are assigned to a specific user.
-
Account locking, reserved accounts, and roles.
-
Security plugins.
-
Backups.
We will now start from the top and move towards the bottom.
User Security & Access Control
Perhaps one of the most obvious – and most important – things to secure are the user accounts since most of the time when users install MySQL they proceed with queries that look something similar to those outlined below:
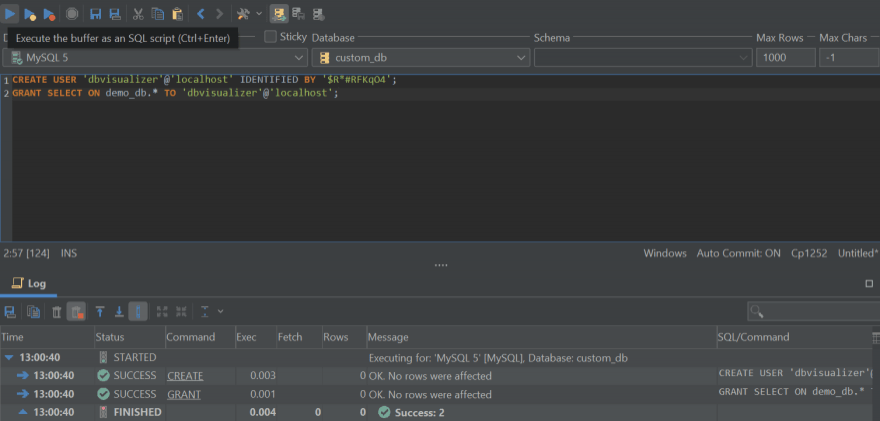
Image 1 - Creating a User & Granting It Privileges with DbVisualizer
These two queries are a good starting point – one of them creates a user, and the other grants the user all privileges on a specific database. Choose a strong password, issue a FLUSH PRIVILEGES statement to save your changes, and you will be on your way.
Once you have taken care of “basic user necessities” so to speak, your user security journey shouldn’t end here – keep an eye on the following aspects as well:
-
Ensure that the privileges that have been assigned are absolutely necessary to accomplish the duties of the person using the account – avoid granting all privileges if the user is only going to run
SELECTqueries. Always consider the perspective of an attacker – if the privileges are limited, so are his options. -
Always keep in mind the capabilities of reserved accounts – these include the “root” user, the “mysql.sys” user, and the “mysql.session” user. These complete the following purposes:
-
The ‘root’@’localhost’ user is a superuser having all privileges across all MySQL databases. Consider renaming the account to strengthen the security on that front – a query like so will do:
RENAME USER ‘root’@’localhost’ TO ‘username’@’localhost’;
-
The ‘mysql.sys’@’localhost’ user is used to work with various procedures and functions related to the MySQL infrastructure.
-
Finally, the ‘mysql.session’@’localhost’ user should not a mystery as well – it’s used by plugins to access MySQL.
-
It is also very helpful to keep in mind that MySQL comes with powerful password management features, which can help you on multiple fronts too (we’ve provided some examples below):
-
MySQL can help you if you want to expire a password of a specific user – doing so can be helpful as a security precaution or when following security guidelines outlined by the security team at your company – see example #1.
-
If necessary, passwords can be set to expire after a certain period of time has passed – see example #2.
-
There are some options that can be set in the MySQL configuration file (my.cnf or my.ini, depending on the operating system that is in use) that can ensure that passwords are reset after a specified period of time or passwords are not re-used before a specified amount of time passes – see example #3.
-
It is also helpful to know that MySQL can generate random passwords (this one is probably most useful to those who are using password managers to save their credentials in – you don’t always have to use the password manager to generate a fresh password for an account) – see example #4 for how MySQL can help. Keep in mind that you also need to be running MySQL 8 or above.
-
If you find yourself using MySQL 8 or above (MySQL 8.0.19 or above to be specific), also keep in mind that you can also temporarily lock accounts after a specified amount of login failures – this feature can be used to prevent bruteforce attacks targeted at the database – see example #5.
-
Finally, if you find yourself using MySQL 8 or above, also keep an eye out for roles and account categories. Roles are essentially collections of privileges, and account categories distinguish system users from regular users for greater control on the security front:
-
Create a role by running the
CREATE ROLEquery like so:
CREATE ROLE ‘demo_role’;
Then, assign a privilege to a role:
GRANT INSERT, UPDATE, DELETE ON demo_db.* TO ‘demo_role’;
And finally, assign a role to a user by following the query below (replace dbvisualizer with the name of your user):
GRANT ‘demo_role’ TO ‘dbvisualizer’@’localhost
Keep in mind that MySQL 8 introduced “system users” to its infrastructure: assign a SYSTEM_USER privilege to a user to make it a system user – any users without such a privilege will be considered to be regular users. The SYSTEM_USER privilege is required to manage user accounts (create users and grant privileges to them) meaning that regular users won’t have the ability to run the CREATE USER and GRANT queries. All system users also have the ability to kill sessions and queries within them and do a couple more interesting things – to view all of the capabilities of a system user, refer to the MySQL documentation .
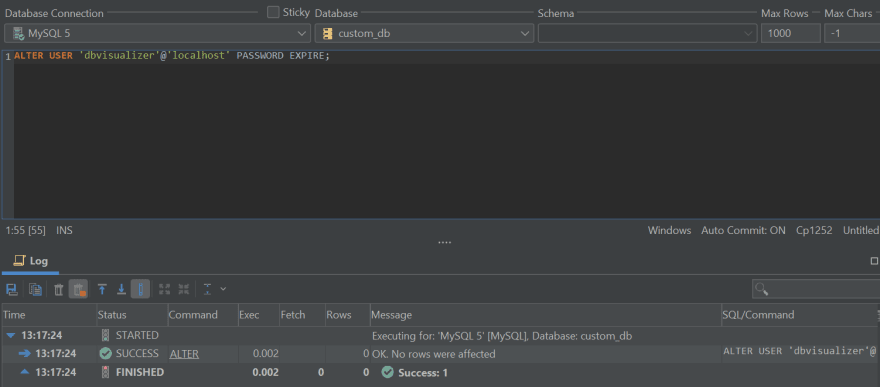
Image 2 – Example #1 Manually Setting a Password to Expire
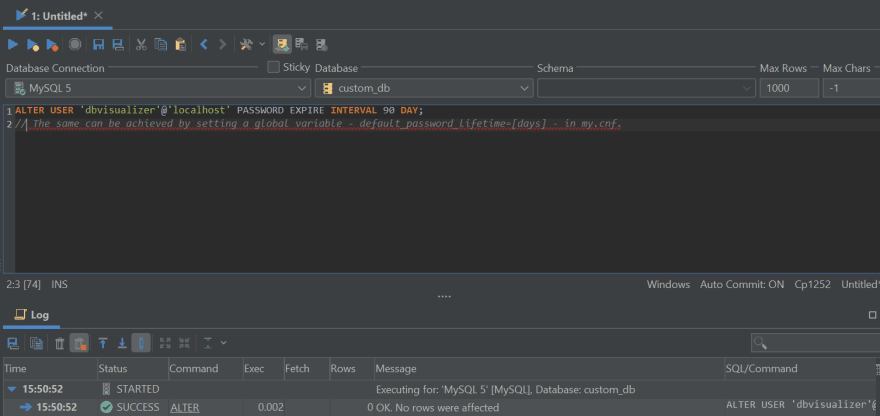
Image 3 - Example #2 Expiring a Password After 90 Days

Image 4 – Example #3 Password Options in my.cnf

Image 5 - Example #4 Creating a User with a Random Password & Setting a Random Password to a User – the options are only available when using MySQL 8 and above.
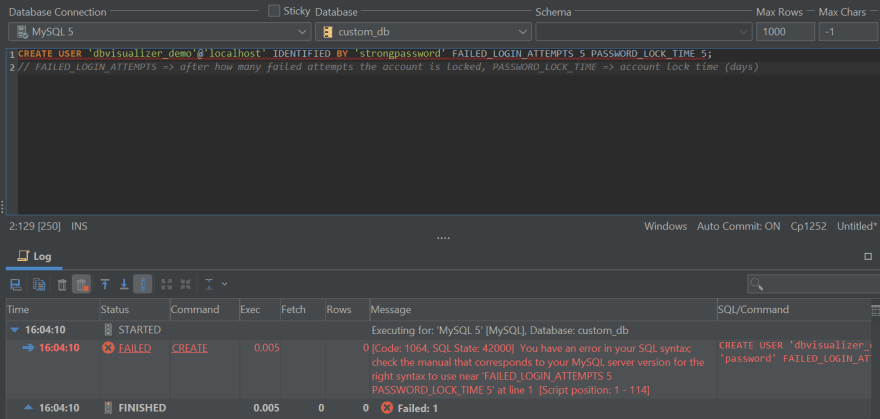
Image 6 - Example #5 Setting a Password & Protection From Bruteforce Attacks – MySQL 8 or newer is required to avoid errors (see below.)
Security Plugins
As far as security plugins are concerned, they fall into one or more of the following categories:
Firewall and audit plugins:
- Perhaps one of the most known such plugins in the MySQL space is the MySQL firewall – a firewall is able to protect data in the database from unauthorized activity by blocking SQL injection attacks and detecting other intrusion methods. However, the firewall is an enterprise addition meaning that the users who elect to use this plugin can expect to pay a hefty price (users need to contact MySQL and ask for the firewall in order to buy the product.)
Secure authentication and password plugins:
- Such plugins secure the authentication mechanism of MySQL. They can help users choose secure passwords – all you need to do is to include the following line inside of our my.cnf file and restart MySQL:
plugin-load-add=validate_password.so
Once that’s done, you would then need to set a password strength policy by utilizing the validate\_password\_policy variable. The password policy you choose will have a direct impact on the length of passwords that can be used – more information about password policies can be found here :
validate_password_policy=[LOW|MEDIUM|STRONG]
Connection-control plugins can offer protection from brute-force attacks: they can be used to increase the delay in MySQL responses if the connection attempts exceed a specified number – implement the plugin by including this line into your my.cnf file, then head over to the docs to finish setup :
plugin-load-add=connection_control.so
Completing each of the steps covered above will cost you some time, however, each of them rewards your database in their own way – read the documentation surrounding these security measures if you’re not too sure what they do, and only implement those measures you thoroughly understand.
The steps above should help you secure your MySQL infrastructure and put it on the security highway – make sure to back up your data frequently and feel free to stop reading here. After completing the steps outlined above, the security level of your database infrastructure should be high enough to turn intruders away. However, true security fanatics might want to continue reading since now we’re going to jump into the waters of backup security.
Securing Backups
Securing backups isn’t anything revolutionary – on that front, we just need to make sure backups are stored securely, or in other words, in an encrypted fashion.
To encrypt backups, first take and test them, then if you find yourself using Linux, use the following command:
$ openssl enc -aes-256-cbc -salt -in backup.tar.gz -out backup.tar.gz.encrypted -k password
where:
-
aes-256-cbc defines the encryption method ( AES 256 is a well-known industry-standard option. )
-
saltmakes sure the hash is salted ( salted hashes are harder to crack because a salt is used as an additional part of a hash. ) -
-in backup.tar.gzdefines the input (backup) file. -
-out backup.tar.gz.encrypted defines the output (secured backup) file. -
-k passworddefines the password that the backup should be encrypted with.
To decrypt the backup, use the following command:
$ openssl aes-256-cbc -d -in backup.tar.gz.encrypted -out backup.tar.gz -k password
All the same here, just note the “-d” part of the command: it specifies that the password should be decrypted rather than encrypted. First specify a path to the encrypted backup, then specify the name of the decrypted backup file as an output (after the -out part of the command.)
That’s perhaps the easiest way to deal with security regarding backups – however, if you don’t want to encrypt your backups and you would still prefer to backup in the traditional fashion, make sure to specify your user and password underneath mysqldump in my.cnf (see example below), then back up your data as usual.

Image 7 - setting a user and password for mysqldump
Doing so will enable you to run the mysqldump command without providing a username and a password – that’s a good security practice since usernames and passwords can be observed by looking at the last issued commands via the terminal – however, once you’ve specified the username and password in my.cnf, you can run mysqldump without providing a username nor the password like so:
$ mysqldump database_name table_name > backup.sql
For all available options relevant to mysqldump , please refer to the docs of MySQL .
Summary
Securing the architecture of MySQL isn’t the easiest thing to do – however, aside from protecting our applications from prominent threats like those outlined in OWASP Top 10 , it’s an absolute necessity.
After you’ve familiarized yourself with the methods of protection, consider utilizing the power of data breach search engines to be informed once your account is in danger of identity theft , and you should be good to go!
We hope you’ve enjoyed reading this article – come back to the blog of DbVisualizer to learn more about databases and their interaction with applications after you’ve secured your infrastructure, and until next time.
DbVisualizer is the highest rated MySQL client. , download DbVisualizer for free and find out what it has to offer!

