Android DevOps CI/CD Pipeline Architecture

Hello there! Android devs????, This article how to develop and maintain easy building, flexible...
Hello there! Android devs????, This article how to develop and maintain easy building, flexible maintenance, automated deployment and other DevOps operations for android applications using GitHub Actions and deployment in Google Play Store!
What is meant by CI ?
CI stands for Continuous Integration , which is a development practice that delivers software to the end user with production reliability. The Continuous Integration (CI) is an automated integration process which generates a build and runs automates tests against it. Usually, a CI is attached with a Repository or Codebase and all the changes are merged before starting it.
What is meant by CD ?
CD stands for Continuous Delivery , which is an automated process of deploying and making the application available successfully to use. The CD process is started only when the application has passed through the integration process and tested with no critical issues.
CI/CD for Android App

CI pipeline
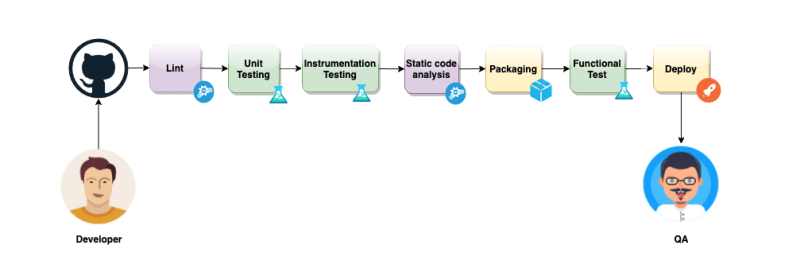
Now let us design our CI pipeline flow so that we are clear what we want to achieve. For any Android project I would recommend the following steps:
- Android Lint Check
- Unit Tests
- Instrumentation Tests
- Static Code Analysis
- Build Debug apk (Packaging)
1. Setup GitHub Actions for repository
To add GitHub Actions workflow file to your repository you need to create a yaml file .github/workflows/ci.yaml
name: CI

on:
 push:
 branches: [main]
 pull_request:
 branches: [main]

jobs:
 start:
 runs-on: ubuntu-latest
 steps:
 - name: Checkout the code
 uses: actions/checkout@v2

 - name: Run sample script
 uses: echo Hello, world
- name- refers the action name
- on push, pull_request- It states the branch to be used for CI process when push or pull_request to the specified branch happens.
- jobs- used for specifying the jobs to be performed
- sample- the name of job to be performed
- runs-on- it specifies on which serves should the process be performed say ubuntu
- steps(name, uses)- Each step has its own name and uses, and the first step should be to checkout the code
2. Perform Android Lint check
What is meant by Lint ?
The lint tool checks your Android project source files for potential bugs and optimization improvements for correctness, security, performance, usability, accessibility, and internationalization. Basically it's an basic code correction and suggestion tool
Now that our basic configuration is in place, we will add Lint check as our first job. Let us understand what the following configuration does.
Step 1: runs-on: ubuntu-latest tells to run the job on latest ubuntu machine
Step 2: actions/checkout@v2 action checks out the codebase on the machine
Step 3:Once we have the codebase on the machine, run ./gradlew lintDebug
Step 4:Publish the lint report as a github artifact
lint:
 name: Perform lint check
 runs-on: ubuntu-latest
 steps:
 - name: Checkout the code
 uses: actions/checkout@v2

 - name: Run lint
 uses: ./gradlew lintDebug

 - name: Upload html test report
 uses: actions/upload-artifact@v2
 with:
 name: lint.html
 path: app/build/reports/lint-results-debug.html
- with- it uploads the artifact as the specified name to the path
3. Perform Android Unit Tests
What is meant by Unit Testing ?
Unit tests in Android are used to test individual units or components of an application in isolation. These tests focus on verifying the functionality of a specific class, method, or module without external dependencies.
Unit Tests reference: https://developer.android.com/training/testing/local-tests
Our second job would be to run the unit tests. This job will run after the lint job and that is why you see needs: [lint] in the below config.
Step 1: runs-on: ubuntu-latest tells to run the job on latest ubuntu machine
Step 2: actions/checkout@v2 action checks out the codebase on the machine
Step 3:Run ./gradlew test will run the unit tests
Step 4:Publish the test report folder as a github artifact
unit-test:
 name: Perform Unit Testing
 runs-on: ubuntu-latest
 steps:
 - name: Checkout the code
 uses: actions/checkout@v2

 - name: Run tests
 uses: ./gradlew test

 - name: Upload test report
 uses: actions.upload-artifact@v2
 with:
 name: unit_test_report
 path: app/build/reports/test/testDebugUnitTest/
- needs- the keyword states that the current job as to be executed only when the specified job is been completed say lint
4. Perform Android Instrumentation Tests
What is meant by Instrumnetation Testing in Android ?
Instrumentation tests in Android are used to test the behavior of an application in a real device or emulator environment. These tests simulate user interactions and validate the integration between different components of the application. It also includes UI testing and functionality binding with UI
Our 3rd job would run Android instrumentation tests. We are running this job on mac-latest machine. That is because the modern Intel Atom (x86 and x86_64) emulators require hardware acceleration from the host to run fast. The macOS VM provided by GitHub Actions has HAXM installed so we are able to create a new AVD instance, launch an emulator with hardware acceleration, and run our Android tests directly on the VM.
⚠️Important:Since macOS machines hosted by GitHub consumes more time compared to Linux and Windows machine. Make sure that you don't consume more amount of time spending instrumentation test, exceeding free plan. Checkout this official page for more reference: GitHub Actions Minute multipliers
A 3rd party tool would be used for running Android Emulators reactivecircus/android-emulator-runner@v2 and running the instrumentation tests using ./gradlew connectedCheck
instrumentation-test:
 name: Perform Instrumentation Testing
 runs-on: macos-latest # MacOS runs faster
 steps:
 - name: Checkout the code
 uses: actions/checkout@v2

 # Gradle v8.0.0 requires java JDK v17
 - name: Set up Java JDK 17
 uses: actions/setup-java@v1
 with:
 java-version: '17'

 - name: Run espresso tests
 uses: reactivecircus/android-emulator-runner@v2 # 3rd party tool
 with:
 api-level: 29
 script: ./gradlew connectedCheck

 - name: Upload Instrumentation Test report
 uses: actions/upload-artifact@v2
 with:
 name: instrumentation_test_report
 path: app/build/reports/androidTests/connected
5. Static Code Analysis using Sonarqube
How can check my code quality using external tools ?
Static code analysis is a technique used to analyze the source code of a program without actually executing it. It helps identify potential bugs, security vulnerabilities, code smells, and other issues in the codebase. Static code analysis tools analyze the code for patterns, best practices, and potential issues based on predefined rules or heuristics
In order to perform Static Code Analaysis, we will be using Sonarqube and SonarCloud. The minimum version required for sonar scanner is Java 11 and that is why you see a step to setup Java 11 jdk on the machine. To utilize Sonar scanner for analyzing code, a new account and project has to be created in Sonarcloud to integrate with GitHub Actions.
Step 1: runs-on: ubuntu-latest tells to run the job on latest ubuntu machine
Step 2: actions/checkout@v2 action checks out the codebase on the machine
Step 3:Modify gradle.properties with sonarcloud project details
Step 4:Create a SONAR_TOKEN for the project in Sonarcloud website
Step 5:Add the token to GitHub secrets and title with desired token name
Step 6:Run ./gradlew app:sonarqube -Dsonar.login=${{ secrets.SONAR_TOKEN }} to allow sonarqube to scand and perform code analysis
Add the following code to gradle.properties as follows:
...
# Sonarqube
systemProp.sonar.sources=./src/main
systemProp.sonar.host.url=https://sonarcloud.io/
systemProp.sonar.organization=tharunbalaji2004 # As per your sonarcloud profile
systemProp.sonar.projectKey=TharunBalaji2004_android-ci-cd # As per your sonarcloud profile
systemProp.sonar.projectName=android-ci-cd # As per your sonarcloud profile
Running sonar cloud scan command in ci.yaml file:
static-code-analysis:
 name: Perform static code analysis
 runs-on: ubuntu-latest
 steps:
 - name: Checkout the code
 uses: actions/checkout@v2

 - name: Set up Java JDK 17
 uses: actions/setup-java@v1
 with:
 java-version: '17'

 - name: SonarCloud Scan # sonarcloud properties in gradle.properties file
 run: ./gradlew app:sonarqube -Dsonar.login=${{ secrets.SONAR_TOKEN }}
 env:
 GITHUB_TOKEN: ${{ secrets.GITHUB_TOKEN }}
6. Build Debug APK
Reaching the last section ofAndroid CIPipeline ????✅
The last step of Android CI ends with building up .apk debug package after passing all tests along the pipeline.
Step 1: runs-on: ubuntu-latest tells to run the job on latest ubuntu machine
Step 2: actions/checkout@v2 action checks out the codebase on the machine
Step 3:Once we have the codebase on the machine, run ./gradlew assembleDebug --stacktrace
Step 4:Upload the apk packkage to GitHub as artifact
debug-apk:
 name: Generate Debug APK
 runs-on: ubuntu-latest
 steps:
 - name: Checkout the code
 uses: actions/checkout@v2

 - name: Set up Java JDK 17
 uses: actions/setup-java@v1
 with:
 java-version: '17'

 - name: Build debug APK
 run: ./gradlew assembleDebug --stacktrace

 - name: Upload APK
 uses: actions/upload-artifact@v2
 with:
 name: sample-app.apk
 path: app/build/outputs/apk/debug/app-debug.apk
CD pipeline
After lots of testing and validating the debug apk, lets design our CD pipeline. This involves creating release package to public users. I would recommend these methods:
- Functional Testing
- Build signed APK
- Build signed AAB
- Deploy app using Google Play Console
1. Functional Testing
Functional testing for Android applications involves testing the application's functionality to ensure that it meets the desired requirements and behaves correctly. It also covers app UI testing, Navigation testing, Performance and Compatability Testing
To perform functional testing for Android applications, you can use various tools and frameworks, such as Espresso, UI Automator, Appium, and Robolectric. These tools assist in automating the testing process and provide features for simulating user interactions, capturing test results, and generating reports. Also considering real-world scenarios and user workflows to ensure the application meets user expectations and delivers a positive user experience.
Working on it ?
2. Build signed APK
Signing process of APKs
Signing an APK (Android Package) is the process of adding a digital signature to the APK file. The digital signature serves as a way to verify the authenticity and integrity of the APK and ensure that it has not been tampered with since it was signed. The signing process involves generating a private key and a corresponding public key certificate
Now lets create a new workflow .yaml file for CD pipeline, we will be building signed release .apk as out first job. Lets discuss about signing the apk:
Step 1: runs-on: ubuntu-latest tells to run the job on latest ubuntu machine
Step 2: actions/checkout@v2 action checks out the codebase on the machine
Step 3:Once we have the codebase on the machine, run ./gradlew assembleRelease
Step 4:Using r0adkll/sign-android-release@v1 sign the app from secret variables
Add GitHub Actions CD workflow file to your repository you need to create a yaml file .github/workflows/cd.yaml
apk:
 name: Build Release signed APK
 runs-on: ubuntu-latest
 steps:
 - name: Checkout the code
 uses: actions/checkout@v2

 - name: Set up JDK
 uses: actions/setup-java@v3
 with:
 distribution: temurin
 java-version: '17'

 - name: Build Release APK
 run: ./gradlew assembleRelease

 - name: Sign APK
 uses: r0adkll/sign-android-release@v1
 id: sign_app
 with:
 releaseDirectory: app/build/outputs/apk/release
 signingKeyBase64: ${{ secrets.SIGNING_KEY }}
 alias: ${{ secrets.KEY_ALIAS }}
 keyStorePassword: ${{ secrets.KEY_STORE_PASSWORD }}
 keyPassword: ${{ secrets.KEY_PASSWORD }}
 env:
 BUILD_TOOLS_VERSION: "30.0.2"

 - name: Upload Signed APK
 uses: actions/upload-artifact@v2
 with:
 name: sample-app-signed # Artifact Name
 path: app/build/outputs/apk/release/*.apk
3. Build signed AAB
What does Android Application Bundle(AAB) mean ?
AAB stands for Android App Bundle. It is a publishing format introduced by Google for Android applications, developers can use the AAB format to publish their apps on the Google Play Store. It also allows for more efficient updates and enables developers to take advantage of dynamic delivery features provided by the Google Play Store
Now lets create a new workflow .yaml file for CD pipeline, we will be building signed release .aab as out first job. Lets discuss about signing the bundle:
Step 1: runs-on: ubuntu-latest tells to run the job on latest ubuntu machine
Step 2: actions/checkout@v2 action checks out the codebase on the machine
Step 3:Once we have the codebase on the machine, run ./gradlew assembleRelease
Step 4:Using r0adkll/sign-android-release@v1 sign the app from secret variables
bundle:
 name: Build Release AAB
 runs-on: ubuntu-latest
 steps:
 - name: Checkout the code
 uses: actions/checkout@v2

 - name: Set up JDK
 uses: actions/setup-java@v3
 with:
 distribution: temurin
 java-version: '17'

 - name: Build Release AAB
 run: ./gradlew bundleRelease

 - name: Sign app bundle
 uses: r0adkll/sign-android-release@v1
 id: sign_app
 with:
 releaseDirectory: app/build/outputs/bundle/release
 signingKeyBase64: ${{ secrets.SIGNING_KEY }}
 alias: ${{ secrets.KEY_ALIAS }}
 keyStorePassword: ${{ secrets.KEY_STORE_PASSWORD }}
 keyPassword: ${{ secrets.KEY_PASSWORD }}
 env:
 BUILD_TOOLS_VERSION: "30.0.2"

 - name: Upload Signed AAB
 uses: actions/upload-artifact@v2
 with:
 name: sample-app-bundle # Artifact Name
 path: app/build/outputs/bundle/release/app-release.aab
4. Deploy app using Google Play Console
For making a release to PlayStore, we need a service account json file, which is created from Google Play Console. And Play Store publisher permission access, which is created from Google Cloud. Kindy refer this article to create service account and grant permission for CD pipeline to deploy in play store
After creating the service account .json file, upload it to GitHub secrets and specify the value in workflow file.
Step 1: runs-on: ubuntu-latest tells to run the job on latest ubuntu machine
Step 2:Specify the service account json secret file
Step 3:Using predefined action r0adkll/upload-google-play@v1 to deploy app on playstore
deploy:
 name: Deploy release AAB on Playstore
 runs-on: ubuntu-latest
 steps:
 - name: Create service_account.json
 run: echo '${{ secrets.SERVICE_ACCOUNT_JSON }}' > service_account.json

 - name: Deploy to Play Store
 uses: r0adkll/upload-google-play@v1
 with:
 serviceAccountJson: service_account.json
 packageName: ${{ github.event.inputs.app_id }}
 releaseFiles: app/build/outputs/bundle/release/*.aab
 track: production
Thats it! Congrats for deploying you Android app on Play Store ????✅

